Extra Buffer nodes

thx in advance! :)
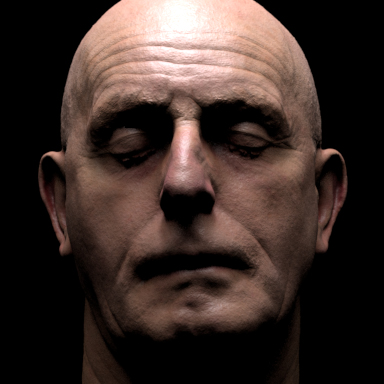
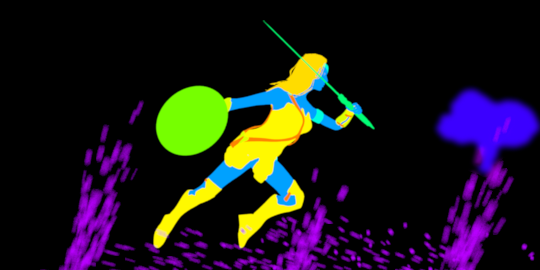
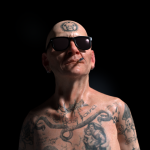
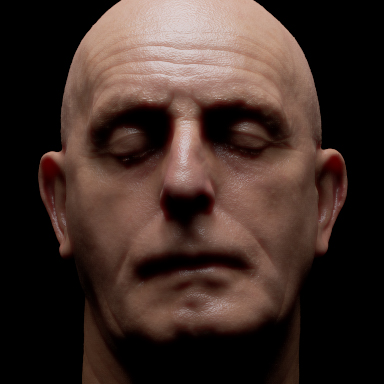
i recently took a very old scene and character, updated it to LW2018 PBSDF material only, even for the Skin. it was almost impossible to render without fireflies, pretty much exclusively on the skin and of course due to use of 'clearcoat', which looks pretty. your simple DP_Median node chain saved me! in this special case i could even make use of the SurfaceMask node, to restrict median filtering to skin only. tiny bit awkward, but it worked in this case. it really only got rid of the flies, while retaining the fine skinpore specular pixels. i could render with very low quality settings overall: Reflect 2, Subsurf 4, Radio: 8, Camera 1/8. :)
pic: View attachment 143866

movie w audio (seems to default to 360p but is 720p, fullscreen only via youtube):
 

Attachments

  • DPMedian_03.png
    DPMedian_03.png
    879.5 KB · Views: 430
Last edited:
Quantenschaum, Ok! I'll make a step by step tuto.

Gar26lw, from the post about DPFilter update news for v2018 to last post about DP Antialiasing, renders are full v2018, excepting the LW Hero scene which is full v2015 and the color management process of the cartoon-style render which is a back and forth between both versions (but that's kind off-topic for this thread). However in any of both exceptions, the subjects covered for this thread apply for both versions indistinctly, seeing that DP Antialiasing is used in the same way in both versions and Surface/Object Matte nodes used with DP CustomBuffers in v2018 can be used also in v2015 with DP ExtraBuffers. But you are right, from now on if I use v2015 or a mix, I'll specify, if don't - then v2018 can be assumed :)


Gerardo


thankyou very much for that clarification, Gerardo, much appreciated :)

cheers
 
Quantenschaum, Wow!! seems to me you should write that DP Median tuto!

Btw, we can still get some interesting results with DP SSBlur in post for skin. For this output:

nosss.jpg

we can get this just in post:

dpssblur.jpg

As reference, this is how it looks with Skin material:

skinmat.jpg

Pitifully, the method is limited to 3D lights in v2018 since we don't have there DP Backlit node working with GI illumination due to, yes - SDK issues. More info about the method here:

https://forums.newtek.com/showthrea...-SKIN-SHADER&p=1391580&viewfull=1#post1391580

gar26lw, you are welcome!


Gerardo
 
i remember that SS Blur thing, but i never managed to set it up properly! :p
i'm a huge fan of the newer 'Principled BSDF' material and although there's less SS layers than for 'Skin' material, you can get very very close with the right maps/values. render times are also in the acceptable range. but one of the main things is: this character has 1 single surface/material/image set. compact! damn... i looove PBSDF :)

i sometimes do illustrated 'docs' in the 'Lightwave3D Support Group' on facebook with the aim to be as simple and comprehensible as possible, so the noobest noob will get it. :-D would love to do a 'firefly' doccy!

and for dessert, more 'looky' version. best in 720p on YT. tried to counter compression with sharpened post:


cheers
 
Last edited:
Those are excellent new features!!!

Btw, just to let you know Denis has re-added Global Buffers in DP Pixel Filter Node Editor!!! It works with any reconstruction filter and it allows us to use Surface ID / Object ID buffers for making matte object/surface passes able to get motion blur, depth of field and any other subpixel effect.

wwid1.png

We can use it essentially in 3 ways:

With Color Tool:

CTool.png

With a Gradient:

Grad.png

And a tip from Denis with a Random Vector:

randVect.png

If we need black background (or any specific background color) we can connect a DP SaveMask node:

savemask.png

More detailed description here.

WWid2.png

So it's as easy as in previous versions!

miniWW.jpg


Gerardo
 
Hi,

I added a Get Light Buffer node in DP Filter 2018,
both Win and Mac versions, compatible with LW2019.

Light Group must be created in Buffer tab, or in Light Properties panel,
this group is valid, if at least one Light belongs to this group.
like for Custom Buffer, Buffers of a Light Group are valid,
if "Render" option is checked in Buffer tab.

Open the Image Filter Node Editor, add a GetLightBuffer node (Buffers tab),
Open its panel and select a Light Group in the list,
of course you can build a nodal setup with several Light Groups.

Thanks to Gerardo for testing,
Denis.
 
Last edited:
With LightWave 2019, I'm struggling to do a global Ambient Occlusion using the DP Pixel filter. I have this set up in LightWave 2015 and it worked great, but since the new renderer I don't see to be able to get it working.
How would I go about setting it up in the 2019 renderer? Any ideas?
 
not sure, I know Denis made an AO plugin for creating a pass in 2019.

Not seen Gerardo around for a while, hope he hasn't left LW
 
With LightWave 2019, I'm struggling to do a global Ambient Occlusion using the DP Pixel filter. I have this set up in LightWave 2015 and it worked great, but since the new renderer I don't see to be able to get it working.
How would I go about setting it up in the 2019 renderer? Any ideas?

Yes, no more possible since LW2018, some features are removed from the SDK,
but I wrote an interactive python script for setting a GlobalAO buffer based on DP Kit AmbOcclusion node,
go on the DP Kit download page.

Denis.
 
Yes, no more possible since LW2018, some features are removed from the SDK,
but I wrote an interactive python script for setting a GlobalAO buffer based on DP Kit AmbOcclusion node,
go on the DP Kit download page.

Denis.

Ah, grabbed that now, thank you very much. Such a shame the SDK doesn't allow for that :( Maybe next year?
 
Ah, grabbed that now, thank you very much. Such a shame the SDK doesn't allow for that :( Maybe next year?

Not sure, old Pixel Filter node editor method was tricky and there's no more
decent access to raytracing functions,
but the Global AO Buffer using Special Buffer is probably faster.

Denis.
 
Hi,

Previous addition in DP Filter was a Color Space node,
based on the Lightwave Color Space system,
it is able to save an loaded lut table independently from other usage in Layout,
it can also be used for VPR render with Pixel Filter node editor
and a "VPR Only" option for not applying the filter for F9/F10 render.


I added also a 1D/3D Lut node,
with the advices and help of Gerardo Estrada,
most ascii Lut formats are available ,
like Cube (1D or 3D), 3dl, Cinespace (including 3D with 1D prelut), Pandora, Truelight, etc..

With a few options:

"Invert Data", "Invert Table", checking both may repair order error in 3D Lut or force warm/cold tones.
"Direction Forward" for normal 1D Lut usage, "Backward" for reversing 1D Lut.

View attachment 148066

"Clipped" is the default behavior with 1D Lut for clamping color input in 0-1 ranged values,
"Extrapolated" is a linear extrapolation for highlight upper-bounded input values,
based on an idea from Gerardo.

View attachment 148068


Denis.
 

Attachments

  • 1DLut_Forward-Backward.jpg
    1DLut_Forward-Backward.jpg
    148.9 KB · Views: 328
  • Lut1D_clipped-extrapolated.jpg
    Lut1D_clipped-extrapolated.jpg
    86 KB · Views: 570
Last edited:
Another addition in DP Filter 2015/2018, windows and macUB,

A Color Transfer node,
based on the"Color Transfer Between Images" paper
by Erik Reinhard, Michael Ashikhmin, Bruce Gooch and Peter Shirley.
Using a simple statistical analysis to impose one image’s color target input characteristics
on another color source.

-Works with a "Target Image" picked in the panel or a nodal "Color Target" input,

View attachment 148070


(If you make a search in this long thread, you should find a node setup from Gerardo Estrada,
which shows maths behind this node)


Denis.
 

Attachments

  • ColorTransfer.jpg
    ColorTransfer.jpg
    192.5 KB · Views: 410
Last edited:
Back
Top