Revisiting native Fiber FX

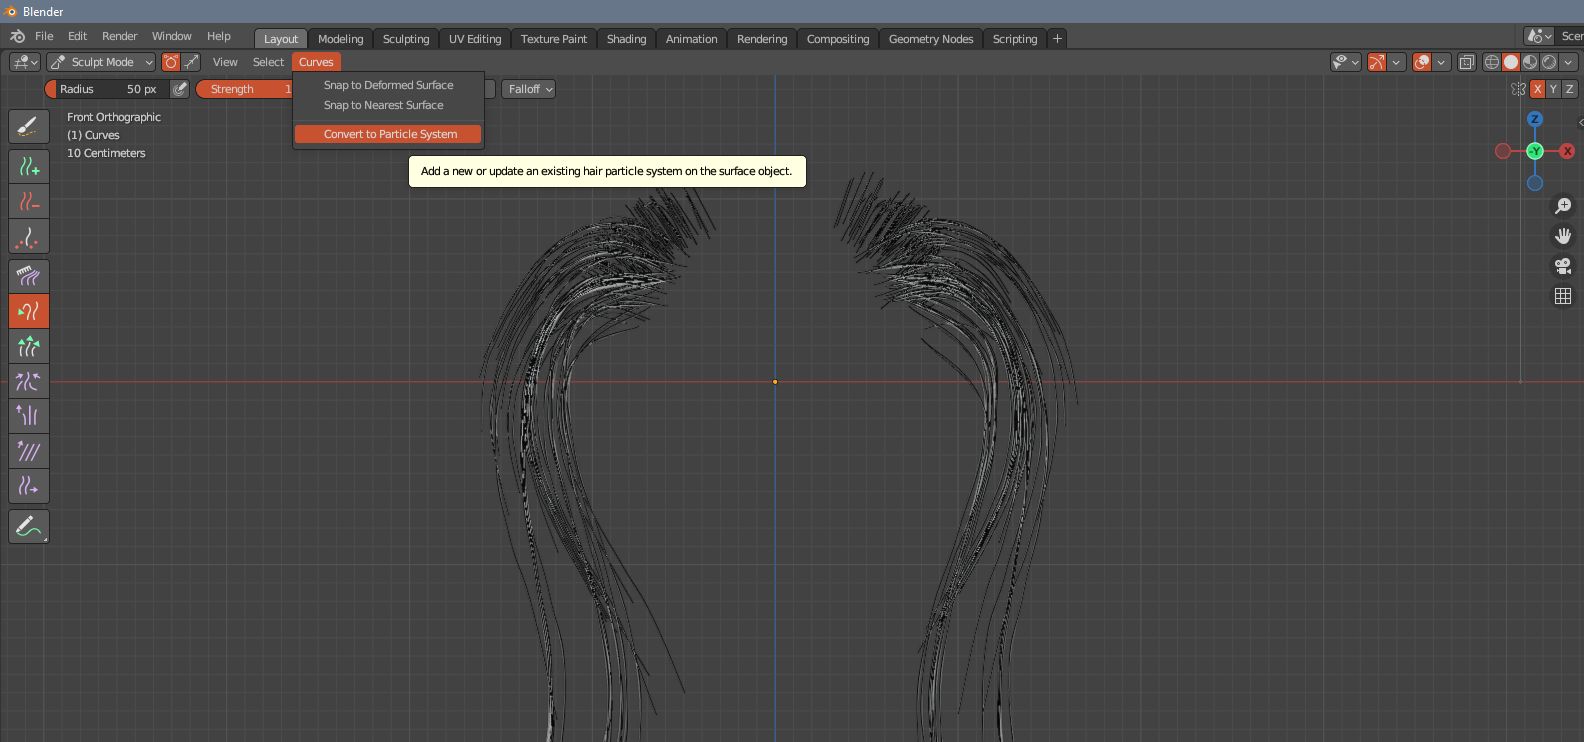
And as I mentioned before in this thread in my post 12, I asked to myself how to convert blender new empty hair curve tools to a mesh, had to ask over there in the forums..and there was a quite simple way, you just have to go to the sculpt mode for the empty hair, and in the curve menu and convert the curves in to the particle system, which is the old hair system, from there you can then convert that particle system to a mesh, save out as obj, import in to Lightwave and the fiberfx applied in Layout worked nicely without a crash.

But this I may or may not record later, and put in the 10001 ways to use blender and Lightwave.

The new blender hair tools is much nicer to apply hair with than the older particle hair, and to sculpt deform with things like snake hook etc to draw out the length of any strand or several clusters of strand fibers, but it doesn´t have any kink, braid, twirl options unlike the old system, there are some nodal wizards that have made some advanced math nodes setups for that though, free to download, but otherwise you could after converting to particle system use the braid options in there I think..or just apply that within lightwave as well.

setting the proper spline subdivisions in blender initially is something you need to keep the tounge right in the mouth for though, they are a bit all over the places for controlling that for rendering, and display, and it´s the display settings you need to set right before converting to a mesh.

So to sum it up, Yes..you can draw/sculpt your blender hair with blenders newer hair system, and get it in to Lightwave if you want to use it in your lightwave scenes, with fiberfx.
 
Finally getting back on this. Car was still solidly encased at 10:30 this am, so so much for going anywhere.

But, following your workflow from Modeler & using Edge selection, followed then by using Fiber FX in Layout, dang if that didn't work.

Now I've a reason to learn how to finesse things in Fiber FX.

Ack!Me_000_410.jpg
 
Finally getting back on this. Car was still solidly encased at 10:30 this am, so so much for going anywhere.

But, following your workflow from Modeler & using Edge selection, followed then by using Fiber FX in Layout, dang if that didn't work.

Now I've a reason to learn how to finesse things in Fiber FX.

Glad it works.
Yeah..you guys seem to have gotten a lot of snow.

Fiberfx, taper of, reduce thickness/witdth by using the fiber V gradient, but use vary small values for the first key which should be the root of the hair, and almost no value in the end
 
Haven't touch the later LightWave versions much
I don't think that there is too much of a change

FiberFX in layout seems to be pretty much the same
In model also it seems to be, the same
The big change with LW2018+ was related to how things are being seen by rays in rendering. The changes allowed for much more realistic shading of the fibers. I can not think of any things changing regarding how you style it. But there should be brushes though. That said, I am no expert in Fiber FX. There are a bunch of other people that knows a lot more about it but I havn't seen any of them posting on this forum for years.
 
The big change with LW2018+ was related to how things are being seen by rays in rendering. The changes allowed for much more realistic shading of the fibers. I can not think of any things changing regarding how you style it. But there should be brushes though. That said, I am no expert in Fiber FX. There are a bunch of other people that knows a lot more about it but I havn't seen any of them posting on this forum for years.

Theres only Edit guides, and with that comes push, scale, gather, straighten, single, and the push tool is the only one really worth calling a brush combing.
But edit guides are quite horrible, it is seperated from the actual strands, and are exacly only what it says, guides you use to steer the main strands.

The actual guides is as far as I now locked in it´s guide resolution, you can´t increase it, so a bad representation of how anything really will look once you close the edit guide editor, and then finds out how the results going to be.
So the split of edit the guides from the actual strand is a horrible workflow, there is No other way to brush comb the actual strands themself in layout.

If you really would like to have something decent when styling and combing hair, and still render in lightwave, I would suggest to just learn both the blender particle hair and the new hair tools, the new hair tools (empty hair curves) is so nice you just use the sculpt snake hook, drag our the strand as you want it to be, or clusters of strands.
It is similar to erikals modeler tricks with magic bevel, but better.

use the curve meny when in sculpt mode and convert to particle hair, turn on children hair and set twirls, convert to mesh, save out to obj, load in to lightwave, apply fiberfx without additional kinks, render it out.

if you use guides to style the fiberfx hair in layout directly, you can not use braid I think, you need polychains created first, so you would need to polygonize the fibers with the layout conversion options for that, then set the braid settings up.
it´s more messy than doing it blender.

guides.jpg


fibers after guide.jpg


so for above sample, you can only add kink frizz, and increase fibers of course, but not the braid tools, until you polygonize it...the workflow and choosing the right things though, is just horrible unfortunately.

What I do like with fiberfx though, it is fairly easy to start with basics, and the gradients, slope, fiberv, fractal acess etc.
 
Last edited:
Back in the days we used ZBrush and then transfered the strands over to LW for rendering.

EDIT: They came in nicely and we could even use them with the old school dynamics in LW. Perfect no! But could it sell the shot, yes! Sadly, the production we used this method on was and still is only for people working within Ubisoft. It was not used on any of our official trailers because we moved on to Houdini, which is waaaay better than Blender, but also cost waaaay more than Blender. :)
Yeah..I recall testing Zbrush guide editing as well, but honestly..the new hair tools in blender is better than the Zbrush hair styling in my opinion.
And I just tested the other day that the workflow works to convert the new empty hair curves to obj, and import to lightwave without any crash so far.

I had a thread about it over here..
Houdini drawn hair to Lightwave, seem to work now..though you have to.. | NewTek Forums

So the process is creating in houdini, styling, convert and redirect hair strand direction, export out to lightwave, apply fiberfx.


step1-houdini-hair_zero-density-jpg.146883


step2-import-to-blender_export-o-lightwave-jpg.146884


step4_apply-fiberfx-and-inverted-fiberv-gradient-on-fiber-width-jpg.146886


The particle hair system in blender had no snake hook draw strands, it was that which was so nice with houdini, but now blenders new hair curves has just that, for single strands or clusters of strands depending on your radius and how many strands in the density is set.

And blenders styling within the new hair tools, is in my opinion much easier to work with, easier access without getting lost in nodes, and easier to convert.
blenders hair tool is aiming to reach a somewhat near level to xgen hair, but currently there is no finished braid node setup, apart from some wizards over there that made some bundled within a scene sample, Haven´t checked if that can be re-used within your own samples in a good way though.

There´s some tutorials I need to finish up with, regarding nodal control, math nodes, set position, spline parameter, capture attributes and more, which allows you to make curls on the hair curve, but I just don´t like the workflow of being all nodal, a simple single node in such case called braid, twist etc..that should be in there.

Getting to grips on such nodal math workflow, just kills creativity when all you want is to braid, twirl or twist the hair, within seconds, and not spend time adoring your own capability of using nodes.
 
Last edited:
Just thought I throw this in as I see the Blender curves (I guess) are importing as Houdini curves.

Import obj 2pt Polys Wts2.jpg

I've no idea what the PGEOMETRY V5 flavor is & Modeler doesn't like it,
 
Just thought I throw this in as I see the Blender curves (I guess) are importing as Houdini curves.

View attachment 154489

I've no idea what the PGEOMETRY V5 flavor is & Modeler doesn't like it,

Not sure what you are trying to do now?
I see obj file in there? where from? blender?

The blender curves, new hair tools ..curve/empty hair, they can´t be imported as spline curves normally, unless the OD tools handles it, but it´s pointless o import them as curves anyways since you do not want that, but polychains.

to use the new blender hairsystem curves, you add it to a mesh with the curve/empty hair, at first it seems nothing has happened, then you go to the sculpt tools, and there you can sculpt in density then use snake hook sculpt to drag out the hair similar to magic bevel.

Then you convert those curves to the older particle hair system, that´s the only way you can get a mesh from it later on in the process, but first you also need to convert the particle hair system to mesh as well after the first curve to particle conversion.
Image showing the first step to convert the new hair curves to the older particle hair system.
Once you have converted the particle hair to mesh, you can save it out as obj, import to lightwave and use them as they are.

The problem in this workflow with two different app´s, once the conversion to a mesh is done, you are a bit stuck with the main strands, so either they may be too many or to few, depending on additional fiberfx children you add etc, and the styling is sort of already set with little options to style again in lightwave, apart from that braiding, twirl etc and kink settings will work on those strands.


bde15fc8291ada75eea9ee7a1f43bdad9ce69bca.jpeg
 
No,no. I was just showing that Oliver's tool is using the Houdini curves as it appears that Blender is doing too. That's the initial obj Daz exports. You load the whole file and it only sees the obj curves.

My, that is a convoluted means to get there.
 
No,no. I was just showing that Oliver's tool is using the Houdini curves as it appears that Blender is doing too. That's the initial obj Daz exports. You load the whole file and it only sees the obj curves.

My, that is a convoluted means to get there.
Understood.
As for convoluted ways..yes, sort of..we only need One conversion directly to mesh, it is now a two step..
-convert to particle hair
-convert to mesh

Though the process isn´t that difficult or take that much time really, it´s done within 5-10 seconds.
 
Getting back to this after finding a vid specfic to exporting dForce hair out of Daz. That technique worked well on a smaller item such as a human head of hair, but not with animal fur.

So I dropped back to Daz & tried again, choosing the AM Weasel. Like all my exports I divide things up so after zeroing any pose, I exported first as a standard OBJ. Then I remove the fur objects & export just the basic character as FBX to get any rigging of course, but also morphs and basic textures. I can then search & find all the rest of maps used for the character.

I also retried Oliver's OBJ Curves Import Tool, leaving the Houdini curves as Curves, and using First 0% incr. to 100%, and that also worked well. On step. And with that already in Modeler, a simple click on Setup/Strand Maker and... not to bad for guide hairs.

Ack!Me_000_688.jpg

In Layout, after importing, parenting, etc, well, ...

Ack!Me_000_689.jpg

Me weasel is looking more like a French Toy Yak at the moment, but I've some good vids that I need to rewatch, one in particular by Maurocor that seemed to answer most of my questions. Always liked his work and I had more that one ahHA's after the first watching. Those textures in the original's folder also have density maps, masks, etc.

Need to revisit the Pteranadon now too I guess.

Important thing is I seem to have a technique to escape from the Daz stranglehold of dForce hair.

But I do like the idea of a French Toy Yak.
 
erikals,

Might you know the differences between the actual Fiber FX panel in 2019 and that shown in the Wiki's and the latest vids I can find?

Fiber FX Panel Differences.jpg

In particular for setting a density map?
TNX
 

sorry, no, but shouldn't be a big deal, just try some misc values,
bcwLfNX.gif


but never set the cluster to higher than 1
clusters are instances, it will make hair look patchy.

(edit; of course you can, but you better know what you are doing, i will not recommend it)

 
Might you know the differences between the actual Fiber FX panel in 2019 and that shown in the Wiki's and the latest vids I can find?

There is nothing wrong in the manual.

FiberFX has two styles of geometry tab. One will be seen when Fibers are grown on surfaces or objects, the other when you use splines or poly chains.

It looks like you're using hair guides so you don't have a texture button for density.

ciao
Thomas

P.s.: Here is the explanation of the different tabs in the manual.
 
Ah. Didn't know about the differing Tabs depending. Yes, I'm trying to use guides generated in Modeler. Perhaps that's where I should look.
 
So, major, major progress.

And one major glitch of course.

But first "The Saga". Condensed.

Back a few years ago (~2018), I started noticing my Daz library had a number of items by the same artist, AM (Alessandro Mastronardi). They were all animals with very high quality fur. Thing was, he'd developed a plug-in for use in Daz (that they subsequently sort of broke) called LAMH; Look At My Hair. He used RMan curves with his system, and they could be sculpted, combed, groomed, etc. And while they remained as the RMan groups, they'd conform to the base figures posing. But once converted to geometry (quad ribbons), they couldn't. Not in Daz anyway, or at least w/o a great deal of add'd effort I suppose.

During the export process via AM's Editor, .obj's & UV texture maps are generated and saved off. Those can be imported into LW of course. Weird looking UV mapping, but it's based on the underlying body texture map so the fur coloration takes on that as well.

Jump ahead a few years and Daz has introduced dForce and AM started to using it for is animals. dForce won't export as the geometry based LAMH hair will. Closed polys. I asked many, many times in several of their forums if there was a way around this and got zilch response.

Wrote Alessandro who's helped me in the past & he didn't know outside of Daz. Of course, Daz gives their artists special tools not available to the masses.

So thumb twiddling until recently when I just happened to come across a vid that revealed what it was I need to know to get all of this to work.

So clear off some hardrive space as you'll probably want to save all this info:

Where ALL the dForce Hair Export Settings are.jpg

Yep, that's it. That's what I couldn't get anyone to point out to me in months & months of asking. Sigh.

Azaleas! (Reference: Steve Martin in "The Man with Two Brains")

So after that, things started to fall into place. As mentioned, I'm using Oliver Hotz's OD2018 Tool of Import .obj Curves. And although it is a curve, it doesn't smell right or something to FiberFX in Layout (not Fiber_FX in Modeler). So I use LWCad to simply convert to NURBS curves & that only takes a couple of seconds for over 2Meg of curves.

Now, FiberFX in Layout is happy. I've no idea why. A lot like a cat.

Plus, although I'm already there, these curves don't need to be converted in Fiber_FX in Modeler. They're already camera ready for FiberFX in Layout, so I import them over there.

As its turning out, many of the techniques I used for the LAMH geometry, I'm having to apply to the Curves. I have to split things up into groups back in Moleler so to not overwhelm FiberFX in Layout when Enabling and Toggling visibility.

I've also gotten the Wt. mapping process figured so it only takes minutes, not hours.

But, there's one glitch that I've not been able to get around.

The curves match in point count, position, but most importantly in weight mapping. I couldn't have seen and confirmed this in a non-geometry item as this w/o TruArts tool of Show Weights. Thanks Sensei. ;}

FiberWeight.jpg

So there are 2, 3, 4, and 4+ point curves. But FiberFX in Layout doesn't want to see the the 2 point curves or rather act upon them.

3 out of 4 Curves.jpg

2pnt only curves dont render.jpg

I've tried couple of things but to no avail. These ARE 2 pnt NURBS curves. They have a visible beginning and end, with a 0% and 100% weighting, so selectable. Something must be doable with all of that available.

So meet the Acme 'alf a Weasel. Well in all fairness, a Haida ermine, pr will be.

Acme 'alf a Weasel CU.jpg

'alf a Weasel Surf CU.jpg

The fur is deliberately course so I can see what's going on. Same with the Whiskers & they are original model geometry. Good to judge scale. Got something going on with the shading but doesn't seem to be with the surfacing.

So, thoughts on what's causing the 2 Pnt issue, or more importantly a solution? I tried setting the 100% to 50%, but no help.
 
Back
Top