OiDN Denoiser - Standalone

For even better results you should also try to use the Albedo and Normal input.

OIDN_03.jpg

For even, even betterer result you should use this setup:
OIDN-Setup.jpg

This setup pre de-noises the 2 AUX passes resulting in a very smooth image. Also Make sure you use the Python scirpt Get_Bounced_Buffer that Denis provides as well. This will take reflected normals and albedo into account..... Very important when you use (highly) reflective/refractive surfaces.
 
For even better results you should also try to use the Albedo and Normal input.

View attachment 151218


In the OpenImagedenoiser documentation you can read more about the use of the albedo input for different materials.
And depending of your color source, you should switch between LDR and HDR and between Linear and sRGB in the panel of the node.

ciao
Thomas
Thanks Thomas! Will give this a shot now.
 
For even, even betterer result you should use this setup:
View attachment 151220

This setup pre de-noises the 2 AUX passes resulting in a very smooth image. Also Make sure you use the Python scirpt Get_Bounced_Buffer that Denis provides as well. This will take reflected normals and albedo into account..... Very important when you use (highly) reflective/refractive surfaces.
Awesome nodal! I'm rendering a house and it's got lots of reflection/refraction maps. I'll post results
 
For even, even betterer result you should use this setup:
View attachment 151220

This setup pre de-noises the 2 AUX passes resulting in a very smooth image. Also Make sure you use the Python scirpt Get_Bounced_Buffer that Denis provides as well. This will take reflected normals and albedo into account..... Very important when you use (highly) reflective/refractive surfaces.
One thing I noticed, I don't have the albedo-denoised node. I have all the other ones, but not this one. What is it?
 
One thing I noticed, I don't have the albedo-denoised node. I have all the other ones, but not this one. What is it?
I simply renamed the OpenImageDenoise node to Albedo-denoised and Normal-denoised.
In my node setup above there are 3 OpenImageDenoise (of which only 1 has the tick box of Cleaned Aux checked) and 2 Get-bounced-buffer nodes.

For a complete setup here some workflow tips:
You do need the latest Intel Denoiser version as well as Dpont's filters.
What you do next is place an extra material node in your materials to 'capture' the bounced rays into a buffer that will be used in the Node Image Filter as a 'Get Bounced Buffer' node as shown above. Don't worry about not selecting the RAW and NORMAL outputs from the Render Buffer node as this will all be dealt with via the 'Bounced Buffer' node. So only the beauty (Color) pass is needed.

There are 2 ways of inserting the material node into your materials;
- Manually --> just look up the 'Write Bounced Buffer' material node and insert it between the Surface node and your shader.
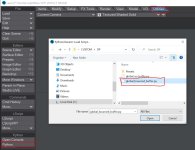
- Automatically --> Use Dpont's Python script to insert (or take away) the buffer automatically in ALL your materials. This is what I always use.

Get-Global-buffer.jpg

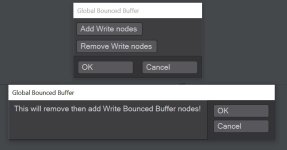
Click on Add Write nodes:
Add-write-nodes.JPG

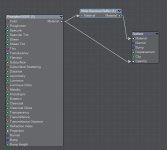
You want to have your final material setup like this:
Write-bounced_Buffer.jpg

Make sure you have your shader go to the OpenGL input as well otherwise everything will turn grey in your OpenGL display.

If you don't have many surfaces perhaps it is wiser to add the buffer node manually as it will have some overhead for materials that you don't need the bounced rays captured.

You can turn off some bounced buffers in the Render Properties/Buffer section as well but I never bother as the speed gain is not that dramatic.

What I have noticed is that a very highly anti aliased normal map works best getting a detailed denoised image. So for a final image you could render the normal pass separate with all the lights turned off as well as ray traced shadows. Now you can crank up anti aliasing to high and generate a smooth normal pass by using the 'Get Global Buffer' node to save the pass. Then denoise the results.
 
Does anyone know where the dynamic libraries should go on a Mac?
Do they just go in the root of the Library directory?
 
There's a text file of instructions included in Denis' download:

Installation:
~~~~~~~~~~~~~
Extract the node plugin in the directory of your choice.

Download:
https://github.com/OpenImageDenoise/oidn/releases/download/v1.4.0/oidn-1.4.0.x86_64.macos.tar.gz
or for a new version go the releases page:
https://github.com/OpenImageDenoise/oidn/releases/


Extract these dynamic libraries (from the ....x86_64.macos\lib directory)
in the /usr/local/lib directory:
In Big Sur MacOS try the LightWave bin folder instead.
 
I simply renamed the OpenImageDenoise node to Albedo-denoised and Normal-denoised.
In my node setup above there are 3 OpenImageDenoise (of which only 1 has the tick box of Cleaned Aux checked) and 2 Get-bounced-buffer nodes.

For a complete setup here some workflow tips:
You do need the latest Intel Denoiser version as well as Dpont's filters.
What you do next is place an extra material node in your materials to 'capture' the bounced rays into a buffer that will be used in the Node Image Filter as a 'Get Bounced Buffer' node as shown above. Don't worry about not selecting the RAW and NORMAL outputs from the Render Buffer node as this will all be dealt with via the 'Bounced Buffer' node. So only the beauty (Color) pass is needed.

There are 2 ways of inserting the material node into your materials;
- Manually --> just look up the 'Write Bounced Buffer' material node and insert it between the Surface node and your shader.
- Automatically --> Use Dpont's Python script to insert (or take away) the buffer automatically in ALL your materials. This is what I always use.

View attachment 151232

Click on Add Write nodes:
View attachment 151233

You want to have your final material setup like this:
View attachment 151234

Make sure you have your shader go to the OpenGL input as well otherwise everything will turn grey in your OpenGL display.

If you don't have many surfaces perhaps it is wiser to add the buffer node manually as it will have some overhead for materials that you don't need the bounced rays captured.

You can turn off some bounced buffers in the Render Properties/Buffer section as well but I never bother as the speed gain is not that dramatic.

What I have noticed is that a very highly anti aliased normal map works best getting a detailed denoised image. So for a final image you could render the normal pass separate with all the lights turned off as well as ray traced shadows. Now you can crank up anti aliasing to high and generate a smooth normal pass by using the 'Get Global Buffer' node to save the pass. Then denoise the results.
Thanks man. How does this nodal setup work with animations? I haven't tried making an animation yet, but this is what I often do for clients, hobby etc.
 
How does this nodal setup work with animations?
Denoising methods in LW, either natively or with Denis' plugin for OIDN, work on the individual frame. These methods do not evaluate the noise reduction within the context of adjacent frames. Flickering is possible in an animation, particularly when using heavy denoising in LW. Animation denoising is best done in a compositor or editor that evaluates adjacent frames.
 
Denoising methods in LW, either natively or with Denis' plugin for OIDN, work on the individual frame. These methods do not evaluate the noise reduction within the context of adjacent frames. Flickering is possible in an animation, particularly when using heavy denoising in LW. Animation denoising is best done in a compositor or editor that evaluates adjacent frames.
Dang. Not what I hoped to hear.
 

not flaw-less, but quite good
bcwLfNX.gif

you might wanna additionally add a NeatVideo denoiser in DaVinci Resolve for even better result.
P13SFkJ.png


Yep I did read that, but don't have a local dir.
Will just try it in the Library directory.
I remember that someone running Catalina OS,
tried with success the OIDN dylib(s) in the Lighwave "bin" directory.

Denis.
 
Last edited:
Thanks man. How does this nodal setup work with animations? I haven't tried making an animation yet, but this is what I often do for clients, hobby etc.
We use OIDN for most animations with good results.
But as mentioned before, individual frames are denoised individual and thus errors in sequences are possible. If the source image is not too noisy, then it will work for animations.

Lightwave's own CPU denoiser should also work for sequences (I have little experience with it). Lightwave's GPU denoiser (NVidia Optix) has similar limitations as OIDN and is not recommended for animations (but it probably works with little noisy images too).

ciao
Thomas
 

if it is still too noisy animation after running OiDN, or similar... run NeatVideo.
NeatVideo will take care of frame-to-frame noise.

 
Dang. Not what I hoped to hear.
So long as you don't rely on the OIDN or the Optix one to remove all noise, it isn't too bad in an animation. I've used it for animations and it just cleans up the noise that might be considered unacceptable. It does process each frame separately, with no temporal stability, but it generally creates a decent result.

I think the Disney denoiser is temporally stable, despite being based on the Intel one (I presume, I think Disney and Intel worked on it together).
I'm trying Topaz Denoise AI, and neat video on AE and making a few tests. The noise removal plugins seem to remove the artifacts caused by OIDN. I'm trying to find a balance between not using a lot of antialising samples and getting a cleaner image in post that doesn't have a lot of blurred details. So far it seems to be working good. I'll post a render later.
 
Here's a test. Denoised with neatvideo. Tried Topaz , but it just didn't cut it or i was doing something wrong. Neatvideo seems to work very well for animations.

15 minimum samples. Noticed a decreased of noise/artifacts if I use AS, but render times go up considerably. Will upload another test. Low res anim, and very short. Takes like 3-4 mins per frame at SD resolutions.

Notice the noise/artifacts on the ceiling of the first floor.

 
Back
Top