Normal maps show in the VPR preview, but not in the render?!

starbase1

May the sauce be with you
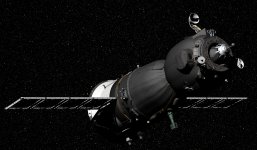
Again I'm back in 11.6.

Importing a rather nice Soyuz TMA model, it was all going rather nicely until I tried an actual render instead of the VPR preview.

And the normal maps that showed up so nicely in the preview are missing in the actual render!

As usual, clues for the clueless are very much appreciated.
Nick
 

Attachments

  • no-normal-render.jpg
    no-normal-render.jpg
    365.1 KB · Views: 152
  • vpr-preview.jpg
    vpr-preview.jpg
    341.7 KB · Views: 148

VPR doesn't display it correctly i think

so go into the nodes setup, and push up the normal map value.
opacity value, afair

 
Node settings, Render Global settings, Camera Settings attached.

I don't see it as a VPR problem, because VPR is showing the wrinkles from the normal map properly, it's the render that is not doing it correctly...

Thanks in advance,
Nickglobals.jpgcamera.jpgnode-settings.jpg
 
A thought occurs... I had odd problems with normal maps from other software before, though in that case it resulted in inverted normal shading...

Does this (smaller) version of one of the normal maps look OK?
 

Attachments

  • Insulation_Descent_normalx.jpg
    Insulation_Descent_normalx.jpg
    65.7 KB · Views: 123
Have you set your normal map to linear in the image editor? In your screenshot it looks too dark to me.

PBR_Image_Editor_01.jpg

ciao
Thomas
 
Last edited:
That's what I was going to suggest. Double check that your Color Space is set to Linear. Don't know if 11.6 has the issue, but things got goobered after 2018 so newly imported maps don't import consistently.

Don't use Default. These no way to define what default actually is.

So set color maps to RGB. Anything else, I just set to Linear (as per Craig Monins, Rebel Hill).

Also, you can turn Use MipMaps to OFF.

You can also plug anything into the color to temporarily see what it' doing of course.
 
Hooray! It's now working.

I tried boosting the strength, no effect at 500%
There was no vertex normal map applied

I tried turning off MIPMAPs and that did the trick!

I'm guessing that VPR ignores MIPMAP's for speed.

I did not continue with trying other suggestions, but thank you all very much, everyone who had an idea.

I'll just mention, the setting for MIPMAP appears in both the image editor and the normal map node. I turned off both, I have no idea which takes priority.

Thanks again,
Nick

I was about to suggest that, though I didn´t engage since you were on lw 2011.
 
... I'll just mention, the setting for MIPMAP appears in both the image editor and the normal map node. I turned off both, I have no idea which takes priority.

With regard to these settings, it's not really a question of priority. It's more a question of purpose.

Some of the settings in the Image Editor are repeated elsewhere and the reason for this is because one version of the repeated setting works in a global scope and the other version works in a local scope.

So in the case of the MipMap setting being in both the Surface Editor and the Image editor, the MipMap in the Image Editor works in a more global scope, meaning that the setting will affect EVERY object that has that particular image applied to it. Whereas the MipMap in the Surface Editor will only affect the individual object which has the image applied to it. So it's a lot more granular.

The MipMap setting can also be found in Render Properties (in 2019 at least) and in this case, the setting affects EVERY image in the WHOLE scene indiscriminately.

This global vs local approach is not just limited to the Image and Surface Editors, you'll find that this approach is repeated with many of LW's settings that are repeated in various places.
 
just having fun with your rocket, not sure I got all parts in to this render though:)
Was just messing around with luxigons on some engines, postprocessing glow can be fine of course, but I like to see it all at once.
lensflares is one option, but volumetrics are cooler/hotter.

the global volumetrics is a bit to slow to use, even if you try and set up it with various nodes.
So I use the trick of just adding a simple volume item in there..just there around the engines with enough radius, much faster to render.
Keep scattering as low as you can or you would get a dark range on it, to make the volume be intense..instead increase volume light intensity by thousands.
Standard material here still, so you could boost that up of course by converting.
There is a slight radiosity picking up a pitch gradient with a slight blueish color to simulate the earth radiation.

soyous.jpg

Above, linear..
Below sRGB preset..

soyouz_sRGB.jpg
 
Last edited:
Boosters missing, load from scene may help you...

I've had good animated results with volumetric spotlights in engines, reddening effect, texture moving rapidly along the beam.
Also try the attached PNG as a projection image, softens up those sharp edges nicely. add noise if you want a subtle streaky effect
 

Attachments

  • engine-mask (4).png
    engine-mask (4).png
    233.4 KB · Views: 126
Boosters missing, load from scene may help you...

I've had good animated results with volumetric spotlights in engines, reddening effect, texture moving rapidly along the beam.
Also try the attached PNG as a projection image, softens up those sharp edges nicely. add noise if you want a subtle streaky effect
Yeah..but I don´t have time to do what you suggest initially, I had to attach powergons, and there is a bit of a mess with all the layers, so I just took the first layer and worked on that, then sent to Layout, the original scene was also very slow to render, so I started with some simple stuff.

As for png projection image, these are pointlights so they don´t have either a volumetric falloff that is sharp, nor any volumetric property at all..so they are not volumetric lights, the volumetric effect is done by using a volumet item, it´s spherical, you can´t usea gradient like that in a similar way, the sharp edges is caused by the light rays being obscured by the actual engines.
So if you want soft glow, all you have to do is to turn off raytrace shadows.

glow volume item.jpg


You can check this thread for additional effects to "simulate" the lightwave 2015 volumetric light effect, which otherwise is No more in Lightwave 2018 and up...

(3) Using volume item none mode to create glow effect, lensflare extra effects, volumetric light per light effects, nebs etc. | NewTek Forums

So this effect I could easy apply to the engines on your rocket as well, if that somehow would add to realism though, highly doubtful :)

4-jpg.153096


lightwave-spiral-light-spin-jpg.153098
 
Last edited:
Back
Top