Using Irradiance Cache w/ Global Illumination

SA9R

New member
Wow, using dual irradiance caching in the GI allows for a final render in 1.5% of the time that it would have taken with just brute force GI.

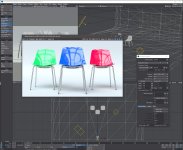
This feature had me baffled when first trying it out in LW. And then I read the online documentation for it, and I still had no beneficial result from it. So I tackled it today, and it does work. In fact, it works quite well. Here are the results, shown in the image below.


4th of july poems

It is a big image with small(ish) text, so click on it and download the original file to read it more easily and see what it is talking about in the render images.

Essentially, Irradiance Cache (IC) is to be used in both the primary and secondary GI options at the same time. In the settings for each IC, check the "Use Cache" and then click the "Bake Frame" button for the secondary IC first and then the primary IC. The first bake will take longer than the second and show red dots whereas the other one will not. Then set the Camera's AA to the minimum necessary for rendering smooth imagery in the direct lighting sections of the image, which would usually be found out first before setting up and using the Global Illumination. The result, is an image that renders without noise in a little over 2 minutes instead of a little over 2 hours, speaking of the simple example scene used in the image above.
 
Last edited:
Here are the render panel shots for the normal render and the render with irradiance cache:


json valide

They are very similar. So I loaded both into Photoshop and checked them with the Difference blending mode. There are some differences, but in terms of quality it is difficult to tell the difference without blowing the levels waaaaaaaaay out of proportion in a photo editor:

 
Last edited:
This speed improvement is better than going from CPU to GPU. Rendering GI with the Irradiance Cache is taking 1.5% of the normal render time.
 
Why is this so weakly documented by LW? Who buys a computer program if they do not understand the great features it offers?
 
Last edited:
That's a good guess. The documentation has been a bit wonky in general though, in the British sense of the word, like it was given the least importance. It needs better structure, language, consistency and examples. It too many cases it lacks clarity, pertinence and motivating visuals.
 
Last edited:
Why is this so weakly documented by LW? Who buys a computer program if they do not understand the great features it offers?
With such a small team, documentation fell behind, both for user manual and the developer SDK. Ben was good to fill in some holes in the manual when he was alerted to them.

We know there was something sketchy going on with NT when Antti had to document this feature on his personal YouTube channel instead of via NT.
 
That's a good guess. The documentation has been a bit wonky in general though, in the British sense of the word, like it was given the least importance. It needs better structure, language, consistency and examples. It too many cases it lacks clarity, pertinence and motivating visuals.
Well, if you're talking overall quality then I think part of that is down to a lot of the content (maybe 70 to 90 percent) being written years ago by engineers. A lot about LightWave has remained the same and so there's been a lot of recycling of information in newer versions of the software. I don't think anyone has really taken the time to invest in re-writing the manual to be more comprehensive or clear for a long time.

I've often thought that the manual as being a bit of an engineers reference book but in no way a teaching guide. That being said though, I think @BeeVee did a great job updating and maintaining the online version of it. I think there were some big improvements from the older printed versions.
 
Wow, using dual irradiance caching in the GI allows for a final render in 1.5% of the time that it would have taken with just brute force GI.

This feature had me baffled when first trying it out in LW. And then I read the online documentation for it, and I still had no beneficial result from it. So I tackled it today, and it does work. In fact, it works quite well. Here are the results, shown in the image below.


4th of july poems

It is a big image with small(ish) text, so click on it and download the original file to read it more easily and see what it is talking about in the render images.

Essentially, Irradiance Cache (IC) is to be used in both the primary and secondary GI options at the same time. In the settings for each IC, check the "Use Cache" and then click the "Bake Frame" button for the secondary IC first and then the primary IC. The first bake will take longer than the second and show red dots whereas the other one will not. Then set the Camera's AA to the minimum necessary for rendering smooth imagery in the direct lighting sections of the image, which would usually be found out first before setting up and using the Global Illumination. The result, is an image that renders without noise in a little over 2 minutes instead of a little over 2 hours, speaking of the simple example scene used in the image above.
Nice find! Have you test it with animations? Any flickering artifacts?
 
Please do a video on this! I have gone through this and I don't get anything close to faster render times as you are showing. Following these instructions are giving me exactly what I discovered when first started using 2020 - render times go through the roof with no improvement to the rendering whatsoever. Render times quadruple! This is exactly why I have not used IC for the last 3 years - I saw no value in it and wished for Interpolated to come back.
 
Last edited:
@ Time Parsons
That's exactly the experience I was getting while trying to use it the first time. Do this: Set both GI options to Irradiance Cache. In each irradiance cache's settings area, scroll down and click the "Use Cache" check box. Then, in the secondary GI irradiance section, click the "Bake Frame" or "Bake Scene" button, depending on what you are rendering. Then do the same in the primary GI irradiance section. Finally, press the render button. It should render much faster, even with the bake times added together.


Ok, I did a short video of 150 frames to check whether there was noticeable light or noise changes between frames. There is noise, and I used VPR's channels to find that it is occurring in the Specular_Indirect channel. It looks like film grain when playing through. Not bad, but I ran it through again with Despike set to 0.01. and it cleaned up quite well.

These use the default Irradiance Cache settings.
First bake time for the secondary GI: 3m27s
Second bake time for the primary GI: 1m49s
Render time: about 1h50m00s

Dual Irradiance Cache


Dual Irraciance Cache with Despike
 
Last edited:
I tried using the PSD Exporter to isolate the specular layer and correct it there, but the buffers available are too few; the PSD Exporter is not up to date.

So, in the case of the noise in the Specular Indirect buffer in this scene, one would have to use Despike and kindly ask LW to update the PSD Exporter.
 
Last edited:
This is neat; it finally makes me think that I can get animations with decent GI lighting done without a farm. It has entered the realm of do-ability.
 
Yeah I followed your steps and the first bake took a couple minutes and the second bake I stopped after 1.5hrs. The Brute Force render took 25secs. I watched Antti's movies several times when 2020 was released and never got anything from my testing that made IC seem worth the effort and still doesn't seem to work. Give me interpolated back or fix this mess LWD. :)
IC_Bake.jpg
IC_BruteForce.jpg
 
There is noise, and I used VPR's channels to find that it is occurring in the Specular_Indirect channel.

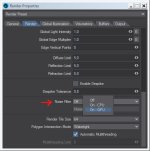
Specular Indirect noise is caused by the reflection (for rough Surfaces). That doesn't cause by GI. To reduce it you have to increase the Reflection samples (Render Properties > Render tab).

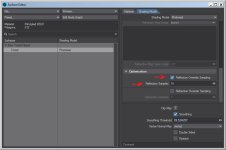
If you only have one very rough surface and the rest are less rough then you can keep the general reflection samples lower and only increase those of the very rough surface in the appropriate surface editor (Shading Model tab > Optimization > Reflection Override Sampling).

Ref_override_01.jpg

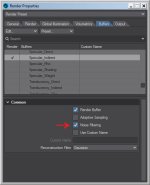
In Lightwave there is the possibility to denoise individual buffers. Enable GPU Denoise (Render Properties > Render tab) and Noise Filtering for the noisy buffer.

Noise_Filtering_02.jpg Noise_Filtering_03.jpg

However, this (unfortunately) only refers to the individually saved buffers and not to the final render output. If GPU denoising is activated, the final render output is always denoised as well. In order to denoise only individual buffers, you have to save all required buffers and combine them in compositing.

ciao
Thomas
 
@ Tim Parsons: Could you show a screen shot of the Global Illumination tab in your scene to show the options you have set up?
Also, this video shows irradiance cache being set up and used for a render:

@ Thomas Leitner: That's a good list of options for denoising. I had seen the "Noise Filtering" option in the buffers tab but hadn't made the connection to this case and denoising individual buffers. Yes, it would be nice to have the option to have the denoised buffer used for the final render instead of needing to composite it in later. Wouldn't compositing the buffer in later mean that there are two, say Specular Indirect, buffers in the final composited render, one in the final render buffer and then another in the composited buffer? There should be a better way of going about things, such as having a buffer exclude option for each buffer in the buffers tab to take one or more buffers out of the final render buffer either because the render is best without it or because it will be composited in separately.

Is there an official list of which blending mode is being used in LW to composite each type of buffer? Knowing would be better than eyeballing it in the compositor.
 
Wouldn't compositing the buffer in later mean that there are two, say Specular Indirect, buffers in the final composited render, one in the final render buffer and then another in the composited buffer?

The preferred workflow for multi-buffer compositing is to select the desired/necessary buffers and save them all together as one Multi-layer EXR. Final Render is not used for this (you can of course also save it as a reference). Of course it is also possible to save all buffers individually (but then you have a lot of files :)).

Check the required buffers in the Buffers tab of the Render Properties.

Render_Buffer_03.jpg

Choose Multi-Layer in the Output tab of the Render Properties.

Render_Buffer_04.jpg


Depending on the materials and the scene, you need to save all required buffers.
In scenes with GI these are usually: Diffuse Direct, Diffuse Indirect, Specular Direct and Specular Indirect.
If there is a transparent material, Refraction Buffer is also necessary, with Sub Surface Scattering materials SSS Direct and SSS Indirect (for GI). Special material properties also have their own buffers. Such as Clearcoat, Translucency and Sheen.

There are also separate buffers for volumetrics. :)

Is there an official list of which blending mode is being used in LW to composite each type of buffer? Knowing would be better than eyeballing it in the compositor.

All the shading buffers are composed using "Add" mode in After Effects or "Screen" mode in Blackmagic Fusion. Other buffers can use other modes such as "Multiply" for Volumetric Transmittance.

Here is an example of compositing in Fusion.

ciao
Thomas
 
Back
Top