You are using an out of date browser. It may not display this or other websites correctly.
You should upgrade or use an alternative browser.
You should upgrade or use an alternative browser.
stereoscopic view
- Thread starter girasole
- Start date
Skinner3D
Creator of the Strange
 Do you mean does it do stereoscopic rendering or do you mean something else. Lightwave very easily does stereoscopic rendering.
 Select a camera
hit the 'p' key for object properties
Click on the stereo and DOF tab
Enable stereoscopic rendering
leave the 60mm separation setting for now. You can play with that later.
Any thing you render with that camera will now render twice, once for the left eye and once for the right.
dwburman
New member
hehe, I've accidentally revived a some dead threads before.
Anyway, There is more than one way to display stereoscopic renders and the 'compose anaglyph' filter overwrites every other image (I don't remember if it's the left or the right image) so it's probably best to figure out another way to combine the images in post.
It's fun to play with, though.
Anyway, There is more than one way to display stereoscopic renders and the 'compose anaglyph' filter overwrites every other image (I don't remember if it's the left or the right image) so it's probably best to figure out another way to combine the images in post.
It's fun to play with, though.
blindsided
New member
How would you go about creating a finished image for use with say the red and green glasses?
dwburman
New member
You can do it in Photoshop by following this tutorial: http://www.larry-bolch.com/shade/anaglyph/
You can probably use this as a guide to figure out how to do it in a compositing app.
There are some more links here that I haven't looked at:
http://graphicssoft.about.com/od/3danaglyphs/Making_3D_Anaglyphs.htm
You can probably use this as a guide to figure out how to do it in a compositing app.
There are some more links here that I haven't looked at:
http://graphicssoft.about.com/od/3danaglyphs/Making_3D_Anaglyphs.htm
blindsided
New member
Thanks for the link, I am sure I had outputted direct from LW a long time ago, maybe version 6.5, probably just imagining it but I seem to remember playing about with it??
Netvudu
Senior Constrictor
As Dana mentioned above (read replies) you can output directly from LW a merged image that allows to watch the anaglyph stereo but it´s just meant for preview purposes as for the real thing you do need two images.
A lot of stereo workflow is appearing in Fusion and Nuke recently and things are getting increasingly easier.
A lot of stereo workflow is appearing in Fusion and Nuke recently and things are getting increasingly easier.
mis
New member
lightwave can also gather the two images by itself witn no problems
hoever theres differnt ways to controle your depth in the z
so you might do some tests.
i myself did quite some stereo images in lightwave
so feel free to pop by my webpage at www.trhlogos.dk
and take a look in my anaglyph section
all done in lightwave
have fun
looking forward to see what you come up with
mis
jeric_synergy
Axes grinder- Dongle #99
MIS-- stereoscopic
(blast from the past)
MIS, exemplary stereo. Are you using the "Anaglyphic:Simulated" image filter to output these images?
Just started messing about w/them, and my attempts are lacking.
j
(blast from the past)
MIS, exemplary stereo. Are you using the "Anaglyphic:Simulated" image filter to output these images?
Just started messing about w/them, and my attempts are lacking.
j
jeric_synergy
Axes grinder- Dongle #99
no luck with ANAGLYPH STEREO:COMPOSE
So, I tried rendering some images using Stereoscopic Render and ANAGLYPH STEREO: Compose image filter.
While the image viewer showed an anaglyph image as the animation rendered, the image actually saved in an F10 render was a single, standard image.
There's a night's render wasted.
So, what's the secret to getting the rendered anaglyphic image SAVED?
Iaian7
Motion Design Lead
Agreed! Much better control using separate cameras. I posted a tutorial for setting up Lightwave's Shift camera in a stereoscopic rig for creating distortionless stereo over on my blog (downloads from vectorform.com), and just added a Quartz Composer tutorial as well for compositing anaglyph images (Anachrome, Triochrome, and ColorCode). Photoshop and After Effects tutorials will be coming soon, but client work comes first.
If you can use a simple screamernet manager like Easy, once a scene is finalised you can save it out to Left and Right versions then set them to render sequentially overnight. Testing first, of course, to make sure it works...but it's usually not too hard to render from two cameras. Not automated, of course, but the output is going to be more reliable.
There's a more detailed discussion over here on some of the math needed for setting up a rig (more specific than what I covered in my tut). Wish I'd seen that before finishing development on my own setup!
jeric_synergy
Axes grinder- Dongle #99
The problem is with the nature of the Image Filter.
Hi guys!
This new tool we are working on over at Liberty3d.com was partially inspired by this thread.
So check it out! We should have beta versions available today. Not all of the functions will be in there, but they are coming very very quickly. Watch the video and I explain more about it.
http://liberty3d.com/2010/09/liberty3d-steroscopic-camera-beta/
Ok we have released our New Liberty3d Stereoscopic camera!
check it out here.
http://liberty3d.com/store/liberty3d-tools/
Introductory pricing is 25.00USD before we release the 1.0 version sometime next week which will have all the bells and whistles in it. Pricing once it releases in 1.0 will be 35.00USD.
Here is a snippit from the current readme.txt
Liberty3D StereoCamera for LightWave3D 9.6 (Win32Bit, Win64Bit, MacUB32Bit)
Build Version: 0.9.32
Build Date: September 25th, 2010
Release Date: September 26th, 2010
Copyright (C) 2010 Liberty3d.com (Declaration Pictures Inc.) and Kiko E. Sato
Engineering: Kiko E. Sato
Design and Concept: Kelly Lee Myers
Website for further information and license details: http://www.liberty3d.com
Contact email: [email protected]
RELEASE NOTES: Build Version 0.9.32
_______________________________________________________________________________________________
In this build, we have introduced the convergence item object selection
dropdown item menu as well as envelope control for the Convergence Limit function.
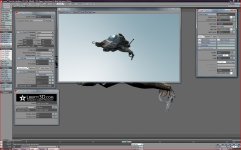
You can now visually see the convergence point by enabling the "Show Convergence Plane" button.
This will draw an orange 2:1m rectangel at the origin of the object selected. This plane only
works in meters in world space. You cannot rescale it at this time.
Where this orange rectangle intersects geometry is the convergence point (aka zero paralax).
At this time, this build does not do "toe-in" operations, however this will be enabled in the
next build after we get some more feed back on how it should be presented to the user and a round
of internal testing.
We highly recommend using null, parented to the camera and then moved on the z axis in front of
the camera as the control item for this function so that it always displays in the camera view,
locked to the camera's rotation and movement.
The plane may not update its drawing location until you make a change on the timeline (advancing
a frame for example). We are trying to find a good way to work around this problem.
You can always create a null with a Custom Object attached to it such as "Range Finder" or
DoF Circle of Confusion, or Item Shape (Like a ball, box for example). This is probably good idea
for more sophisiticated stereoscopic set ups.
This build of the plug-in is not performance tuned, but should perform well on all platforms.
We will be doing a performance tuning to the rendering for 1.0 release.
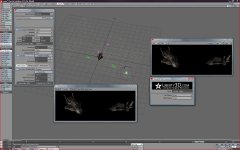
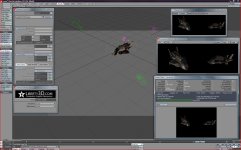
Also in this build we have introduced the Left and Right Eye icons near the camera plane. This
is mostly for show in this build, and is not visible through the camera but can be useful for
determining if the camera is a Liberty3d Stereo Camera or not when visible in any of the other
viewing modes.
If you change the Eye Separation, these Icons will move in relation to that change.
The default eye separation setting is 6cm, which is the same as LightWave3D's standard
stereoscopic function, but you can change this to any number you like and control it with an
envelope.
The scale of the Eye Icons at 1m Grid is relatively accurate for the center circles drawn for
the Eye Icons. These represent the pupils of your eyes.
The Liberty3D Stereo Camera plug-in fully supports Fprime 3.51.
At this time DoF rendering is not enabled. We will be introducing this later on in future builds.
_______________________________________________________________________________________________
BASIC USAGE GUIDE:
_______________________________________________________________________________________________
Adding the Plug-in:
Adding the plug-in to your LightWave installation is done just as any other LightWave plug-in.
You can add the plug-in by hitting Alt+F11 (on the PC), then selecting the Liberty3d Stereoscopic
Camera Plug-in. We highly recommend you place this plug-in in a folder in your layout plug-ins
directory.
Activation:
You need to activate this plug-in by accesssing it through the camera Properties Panel. Once you
have the plug-in installed it should show up as "Liberty3D Stereo Camera' in the drop down menu.
Once selected, hit the properties button next to the camera type and you will be presented with
an Activation box, displaying your hardware dongle ID and a field for the key to be entered into.
You will need to email us your dongle ID number after purchase of this plug-in in order to receive
a key for activation. You can email your Dongle ID number to [email protected]
Once you you receive your key, enter it into the activation key field and hit OK. If everything goes
right, it will say "Key Accepted". If not, please contact us.
This licensing box will not go away on its own. You need to close it using the X button first. Once
you have done this, you can hit properties again and make use of the camera.
Using the camera in your scene:
To make use of the camera in your scene you will need to change the width of the camera resolution
to twice that of the resolution you wish to have a single Eye frame size at.
For example - If you want to output in HDTV format which is 1920x1080, you will need to render your
scene at 3840x1080. This will give you a horizontally wide image twice that of 1920 pixels.
This will give you 1920 pixels per eye when recombined to produce the stereoscopic image.
Our Camera Renders both eyes at the same time which is, as far as we know a capability unique to
LightWave3D and this plug-in. The advantages to this are obvious. You no longer need to render
a scene twice, once per eye in order to get the images you are looking for. This is why our camera
renders the images side by side horizontally. This is very advantagious when working with modern
compositing packages like Eyeone Fusion 6.1 or higher as it has a stereo image combing function that
specifically can make use of horizontally stacked images and combine them to produce the stereoscopic
image result at what is more or less a push of a button. There are other advantages such as scene file
management complexity being reduced,render times over the network are reduced on multiple fronts as well.
While this plug-in is not yet performance tuned, in most scenes it will very closely perform to that
of traditional lightwave stereoscopic rendering operations. We aim to actually go faster than rendering
using the built-in stereoscopic rendering function in LightWave 9.6.
A note on frame display: If you need to accurately preview the framing of your scene through the camera
view, you can use the Alternative Aspect Display function do so. You can enable this through the Display
Options Panel (press d). As a good starting point, use the width of your resolution for your Stereoscopic
target frame resolution. An example of this would be if your target stereoscopic frame resolution
(the final combined stereo image) is to be 1920x1080, enter in a value of 1.92.
This will closely match the actual framing but not exactly. It's a good starting point,
but even the default of 1.85 works right out of the box. Great stuff!
_________________________________________________________________________________________________
For bugs reporting and feature requests:
Please email: [email protected]
Thank you for support of Liberty3d.com!
check it out here.
http://liberty3d.com/store/liberty3d-tools/
Introductory pricing is 25.00USD before we release the 1.0 version sometime next week which will have all the bells and whistles in it. Pricing once it releases in 1.0 will be 35.00USD.
Here is a snippit from the current readme.txt
Liberty3D StereoCamera for LightWave3D 9.6 (Win32Bit, Win64Bit, MacUB32Bit)
Build Version: 0.9.32
Build Date: September 25th, 2010
Release Date: September 26th, 2010
Copyright (C) 2010 Liberty3d.com (Declaration Pictures Inc.) and Kiko E. Sato
Engineering: Kiko E. Sato
Design and Concept: Kelly Lee Myers
Website for further information and license details: http://www.liberty3d.com
Contact email: [email protected]
RELEASE NOTES: Build Version 0.9.32
_______________________________________________________________________________________________
In this build, we have introduced the convergence item object selection
dropdown item menu as well as envelope control for the Convergence Limit function.
You can now visually see the convergence point by enabling the "Show Convergence Plane" button.
This will draw an orange 2:1m rectangel at the origin of the object selected. This plane only
works in meters in world space. You cannot rescale it at this time.
Where this orange rectangle intersects geometry is the convergence point (aka zero paralax).
At this time, this build does not do "toe-in" operations, however this will be enabled in the
next build after we get some more feed back on how it should be presented to the user and a round
of internal testing.
We highly recommend using null, parented to the camera and then moved on the z axis in front of
the camera as the control item for this function so that it always displays in the camera view,
locked to the camera's rotation and movement.
The plane may not update its drawing location until you make a change on the timeline (advancing
a frame for example). We are trying to find a good way to work around this problem.
You can always create a null with a Custom Object attached to it such as "Range Finder" or
DoF Circle of Confusion, or Item Shape (Like a ball, box for example). This is probably good idea
for more sophisiticated stereoscopic set ups.
This build of the plug-in is not performance tuned, but should perform well on all platforms.
We will be doing a performance tuning to the rendering for 1.0 release.
Also in this build we have introduced the Left and Right Eye icons near the camera plane. This
is mostly for show in this build, and is not visible through the camera but can be useful for
determining if the camera is a Liberty3d Stereo Camera or not when visible in any of the other
viewing modes.
If you change the Eye Separation, these Icons will move in relation to that change.
The default eye separation setting is 6cm, which is the same as LightWave3D's standard
stereoscopic function, but you can change this to any number you like and control it with an
envelope.
The scale of the Eye Icons at 1m Grid is relatively accurate for the center circles drawn for
the Eye Icons. These represent the pupils of your eyes.
The Liberty3D Stereo Camera plug-in fully supports Fprime 3.51.
At this time DoF rendering is not enabled. We will be introducing this later on in future builds.
_______________________________________________________________________________________________
BASIC USAGE GUIDE:
_______________________________________________________________________________________________
Adding the Plug-in:
Adding the plug-in to your LightWave installation is done just as any other LightWave plug-in.
You can add the plug-in by hitting Alt+F11 (on the PC), then selecting the Liberty3d Stereoscopic
Camera Plug-in. We highly recommend you place this plug-in in a folder in your layout plug-ins
directory.
Activation:
You need to activate this plug-in by accesssing it through the camera Properties Panel. Once you
have the plug-in installed it should show up as "Liberty3D Stereo Camera' in the drop down menu.
Once selected, hit the properties button next to the camera type and you will be presented with
an Activation box, displaying your hardware dongle ID and a field for the key to be entered into.
You will need to email us your dongle ID number after purchase of this plug-in in order to receive
a key for activation. You can email your Dongle ID number to [email protected]
Once you you receive your key, enter it into the activation key field and hit OK. If everything goes
right, it will say "Key Accepted". If not, please contact us.
This licensing box will not go away on its own. You need to close it using the X button first. Once
you have done this, you can hit properties again and make use of the camera.
Using the camera in your scene:
To make use of the camera in your scene you will need to change the width of the camera resolution
to twice that of the resolution you wish to have a single Eye frame size at.
For example - If you want to output in HDTV format which is 1920x1080, you will need to render your
scene at 3840x1080. This will give you a horizontally wide image twice that of 1920 pixels.
This will give you 1920 pixels per eye when recombined to produce the stereoscopic image.
Our Camera Renders both eyes at the same time which is, as far as we know a capability unique to
LightWave3D and this plug-in. The advantages to this are obvious. You no longer need to render
a scene twice, once per eye in order to get the images you are looking for. This is why our camera
renders the images side by side horizontally. This is very advantagious when working with modern
compositing packages like Eyeone Fusion 6.1 or higher as it has a stereo image combing function that
specifically can make use of horizontally stacked images and combine them to produce the stereoscopic
image result at what is more or less a push of a button. There are other advantages such as scene file
management complexity being reduced,render times over the network are reduced on multiple fronts as well.
While this plug-in is not yet performance tuned, in most scenes it will very closely perform to that
of traditional lightwave stereoscopic rendering operations. We aim to actually go faster than rendering
using the built-in stereoscopic rendering function in LightWave 9.6.
A note on frame display: If you need to accurately preview the framing of your scene through the camera
view, you can use the Alternative Aspect Display function do so. You can enable this through the Display
Options Panel (press d). As a good starting point, use the width of your resolution for your Stereoscopic
target frame resolution. An example of this would be if your target stereoscopic frame resolution
(the final combined stereo image) is to be 1920x1080, enter in a value of 1.92.
This will closely match the actual framing but not exactly. It's a good starting point,
but even the default of 1.85 works right out of the box. Great stuff!
_________________________________________________________________________________________________
For bugs reporting and feature requests:
Please email: [email protected]
Thank you for support of Liberty3d.com!
StereoCam plugin sounds interesting, let me know when it does inside LW anaglyph previewing.
We are looking at a couple of options right now to do that. But it may have to involve rendering either via an F9 or Fprime operation.
We don't have access do what LW10 is doing in openGL at the moment for a 9.6 plug-in. We are going to be making LW10 versions though. That is coming.
We will be introducing additional cameras this week as well.
I already have our new Perspective camera tested, and it nice, but its going to go through an optimization process to increase its speed even more so.
On top of that, our Panoramic, Pin-cushion, Cylinder, FishEye and Multi-Cam plug-ins are also on my desktop being tested now. It's going to be a good week for plug-ins I think