i dream of nodes - well- nightmare, really

mijaba

New member
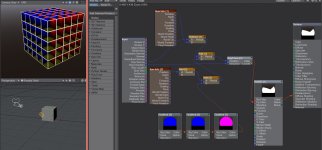
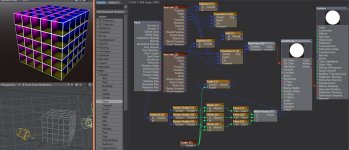
I want the little box to raytrace onto the big box no matter where either one is- I want to be able to TILE the raytraced little boxes side to side, up and down- kind of a poor man's "vroom".
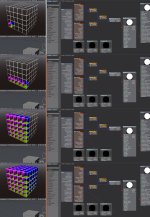
I have watched tutorials, I have raided other people's node setups, I have sampled, switched and altered all of the above.
I'm just not getting it.
It's like a thousand-sided Rubik's cube with a thousand tiles per side. I now dream if incorrect node setup. Not kidding. I LITERALLY have dreams of making the wrong node setup over and over and over.
If I do not get help I will lose my mind.
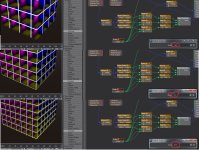
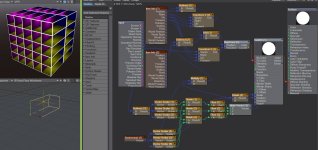
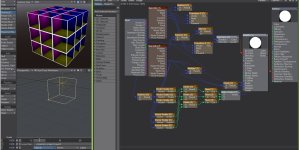
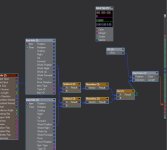
Here is a screenshot and a zip. Please fix or tell me how and I will carve a TIKI PENDANT for you!!!!
View attachment 122270
View attachment 122269
 

Attachments

  • projection project.zip
    23.2 KB · Views: 532
  • node screenshot.jpg
    node screenshot.jpg
    205.5 KB · Views: 634
Last edited:
Did I mention I will hand carve a 100% original and personalized tiki pendant for the person who solves this problem first?
View attachment 122282
TIKI COMPELLS YOU!!!!!
There is a small grove of palm trees out front of my work that get's preened regularly and I have the stems from palm fronds which make EXCELLENT wood for carving.
 

Attachments

  • 10429259_10203296722595428_3273240668110204268_n.jpg
    10429259_10203296722595428_3273240668110204268_n.jpg
    53.2 KB · Views: 590
I'm trying to raytrace virtual rooms for a building using the raytrace node. An example can be seen in the following thread BUT Id like to be able to attach the ray to a null so I can use multiple rooms. That way I can just select which "room setup" I want to use (randomly, if needed) and to top it all of, I'd like to tile them (infinitely) so I can just *fill* a building automatically. In order to do that I have to be able to relocate the rooms to different places so they won't interfere with each other. It doesn't have to be perfect, just flexible.

http://forums.newtek.com/showthread.php?86068-Fun-with-Nodes-UV-holo
 
People have used projection images of rooms on buildings, and other people have used nodes to randomly select amongst the possible image (streams). So, the tech is there, but it's no walk in the park.

Good luck.
 
Why on Earth are you using Dot node there?! UV pos to RayTrace node position?! That could not ever work..

What you really need is simply Environment Baking Camera from TrueArt's Modeling Pack
http://modelingpack.trueart.eu

It's sending ray in the all directions...

Look at video tutorial:
https://www.youtube.com/watch?v=iq5yRATeFms

Two clicks, 1st make Environment Baking Camera, 2nd press F9, and you can attach it as texture..
 
Last edited:
No use asking why I put this node where that node should have been. The answer is quite simple. I'm a nodetard. A nodiot. An ignoderamus.
Thank you Sensei for your direction. (bows in earnest) When I get it working I'm going to owe you a tiki pendant.
:::EDIT:::
It's not going to work. That environment has to be tiled in such a way as to make it appear that they are a multiple of separate rooms vertically and horizontally, which leaves me with my original problem. I appreciate the thought, but if I tile the image that produces as a texture onto a 2D plane it's going to look like an unwrapped room flattened out.
It would work GREAT for designing the room itself, but not for projecting the room, in a tileable fashion, onto (or into) other geometry.
What I'm trying to do is *based* on this idea but with much more flexibility
Thank you again, Sensei
http://forums.newtek.com/showthread.php?86068-Fun-with-Nodes-UV-holo
 
Last edited:
Here you go.

A couple of problems in your scene....

You UV map for the BIG box was set up wrong. Each poly has to fill the UV map space. ie they all overlap each other.

Your source box (the small one) was in the wrong position. It has to have it's front face set to 0,0,0.

Some other things I can't remember.

Edit : Sorry wrong file! Try this :- View attachment 122308
 

Attachments

  • Projector_Working_XSX.zip
    44.9 KB · Views: 537
Last edited:
Medi8or-- if you can move the small box around without effecting the large one then you've just earned a 100% custom tiki
 
I would try it myself, but in a fit of resignation I declared a moratorium on the project for a week. It was really effecting my dreams.
Do you know what it's like to DREAM about getting the wrong node solutions over and over and over again? It's worse than actually doing it in real life-- which I was also doing-- so-- combine the real and imagined disappointment and you've got a good idea why I can't open that file for a week.
 
As it is now, you can move both boxes around, but you can't rotate them.

In this scene I moved the objects a bit, so the nodes get a bit simpler:

View attachment 122318
As you see in the image, tiles are done with the gradients. Red for width, green for height, and blue for depth. There are as many keys in the gradients as there are tiles, and distance between them are same as tile size..
The other nodes checks distance/direction from camera to big box, and sends a ray from same distance/direction towards little box..

Scene:
View attachment 122317
 

Attachments

  • projection M8 – 02.zip
    22.8 KB · Views: 530
  • projection2.jpg
    projection2.jpg
    338.2 KB · Views: 593
Last edited:
Is there any way to apply this without gradients? The gradients work well but they are tailored to the size of the big box. I'm trying to figure out how to compensate for any size room projected onto any size building- (spot size + ray length * scaling / ?) like a procedural fill that can be attached to a UV or other coordinate system.
That way I can basically atlas map every building and select whatever room I want to fill it with.
It's a tall mountain I suppose and I DO owe you a TIKI for your efforts-- so let me know what you want. I can carve just about anything.

EDIT:
I replaced the "input" node with "spot info" since I only have 11.5 and the "input" doesn't seem to have an interface--- it worked
 
Last edited:
Sure, you can do it without gradients.
View attachment 122376
The nodes in the bottom are instead of gradients. Scalar-node is size of tiles.
Transform-nodes allows rotation of big box...

Scene:
View attachment 122377
 

Attachments

  • projection M8 – nogradients.zip
    23.5 KB · Views: 616
  • projection-nogradient.jpg
    projection-nogradient.jpg
    196.8 KB · Views: 614
alright-- you need to be thinking about what you want me to carve. I can carve that little cat's head-- your avatar?
think! You've earned a master carve
 
I routed the scalar to a multiply (x1) node and to the scale of the grid-- I call it "gridlock". The tile of the grid stays unified with the tile of the boxes-- but the boxes don't seem to scale the same way (see picture)
View attachment 122384
View attachment 122383
 

Attachments

  • projection project gridlock.zip
    968.9 KB · Views: 560
  • node upload.jpg
    node upload.jpg
    1 MB · Views: 630
Last edited:
Ah, yes. Grid in Lightwave is centered around the origin. If you move grid by half its size, then it should fit.
Also, as it is now, size must match the size of the small box, or you get funny results. There are some posibilities:
View attachment 122387
Use a node to match the size of small box.
(scalar node is fine for a perfect cube, vector node like this if you need different height/width/depth)
Scene: View attachment 122386

View attachment 122388
You could start with the 1m cube, and use scaling from Item Info node. You then resize small box in Layout...
Scene: View attachment 122389


Or, you could leave the small box alone, and add nodes to control its apparent size. I get some funny results on that one, and it's too hot here for more brain activity... :)
 

Attachments

  • projection M8 – gridsize.zip
    23.5 KB · Views: 621
  • projection-gridsize.jpg
    projection-gridsize.jpg
    181.4 KB · Views: 588
  • projection-smallbox-scale.jpg
    projection-smallbox-scale.jpg
    215 KB · Views: 632
  • projection M8 – smallbox-scale.zip
    23.6 KB · Views: 578
Back
Top