Gerardo Estrada - DPont Denoiser


images were lost and thought this trick deserved it's own thread,
so re-posting a Denoiser tutorial made by Gerardo Estrada > (original thread)


Gerardo Estrada - DPont Denoiser
plugin by Denis Pontonnier

Part 1


Interpolated Radiosity might be very useful in some cases but when having moving objects, splotches may appear:

01-LW_Interpolated.gif
attachment.php


Thus, for such cases, some people just prefer to avoid Interpolated, but noise is commonly the issue then:

02-LW_None.gif
attachment.php


Noise Reduction filter might be a good solution in such cases, but it doesn't work always as expected:

03-LW_Noise_Reduction.gif
attachment.php


Details in textures may be lost and smaller splotches may appear in noisy areas. Have the impression the solution is not applied the same at every frame.

A way to overcome this issue is by using DP Denoiser instead:

04-DP_Denoisier.gif
attachment.php


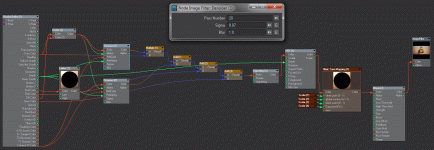
I've devised a node setup in DP IFNE that get rid of the noise by applying the filter in the areas that more need it and by keeping crispy textures:

attachment.php

05-nodes.gif


Gerardo
 
Last edited:

Gerardo Estrada - DPont Denoiser
plugin by Denis Pontonnier

Part 2


The common usage is apply the Denoiser filter in the final color pass and this is the reason why textures may be blurred too. In order to solve this, we apply the filter in the lighting pass instead (you can read more about the lighting pass here). This pass contains the direct and indirect diffuse illumination but without colors or textures:

06-lighting_pass.jpg
attachment.php


Just diffuse lighting, which where we need DP Denoiser to work at:

07-lighting_pass_denoised.jpg
attachment.php


Notice the Normals drives the ReferenceColor parameter, this was recommended by Denis since it helps the Sigma parameter to recognize the edges of the surfaces. Depth drives the ReferenceAlpha and in this case, the illumination pass drives the Alpha, which helps the filter to respect the details in shadowing areas. Passes for the illumination pass might vary from about 5 to 30 by depending on the level of noise. Less passes/samples in lights/shading, faster render times and need higher Blur Passes Number in DP Denoiser. After that, we integrate back the textures by multiplying the Raw Color buffer back to the Diffuse Shading:

08-lighting_pass_denoised_raw.jpg
attachment.php


Additionally, if you have noisy blurred reflections too:
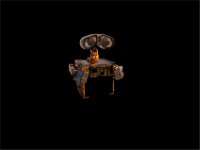
09-reflection_pass.jpg
attachment.php


you might want to try same setup for Shaded Reflection. Commonly, less passes are necessary and a wider threshold may be used (higher Sigma values):

10-reflection_pass_denoised.jpg
attachment.php


If samples are very low (like in this case) and contrast ratios are extremely high (like is also in this case) you might want to limit a bit the luminance values for this pass.

Therefore, we can mix the Shaded Diffuse buffer with the Shaded Reflection buffer (addition):

attachment.php
11-lighting_pass_denoised_raw_refltn.jpg

And later the Shaded Refraction Buffer (additive too):

12-lighting_pass_denoised_raw_refltn_refrctn.jpg
attachment.php


If you have a scattering buffer you have to add it too (and filter it here if it's noisy) by using DP Extra BUffers (SSS/SSS2/Skin Materials/Chanlum) or Global Buffers (Chanlum).

Additionally in this case I've added a vignetting effect with DP Vignetting:

13-lighting_pass_denoised_raw_refltn_refrctn_vigntt.jpg
attachment.php


And the Filmic TMO, plus DP DOF and DP Bloom:

14-lighting_pass_denoised_raw_refltn_refrctn_vigntt.1.jpg
attachment.php


Good thing about DP Denoiser is that it's applied consistently in every frame. This particular setup is suitable for outdoors only. You can play with the settings and if you find a better setup, do not hesitate to share it here


Thanks again to Denis Pontonnier for such useful tools!


Gerardo
 
Last edited:

Gerardo Estrada - DPont Denoiser
plugin by Denis Pontonnier

Addendum


as Denis says, we need to enable the proper buffers in Image Filter node. Also, as specified in the linked article:

Note: In order this node setup may work properly, we need avoid colors with zero values in any of the RGB channels. i.e: instead of using pure red 255/0/0 we can use 255/1/1.

Otherwise, we would need to make direct and indirect illumination passes. The indirect illumination pass is the Radiosity Color Buffer. For the direct illumination pass we may use DP Light Group in PFNE. As you see, much more complex setup, so it's easier just avoiding colors with completely 0 values.

Just in case, I'm attaching the node setup (without the DP Vignetting/DOF/Glare/FilmicTMO) and also including a preset file. The preset file is commonly overlooked in DP FNEs but they are very useful for quick setups since they contain not only the node setups but also the proper settings for the Node Editors (proper buffers and internal options already enabled). For installing on Windows is:

\Users\"YourUserName"\.NewTek\LightWave\"YourLWver sion"\presets\ImageFilterHandler\ImageFilter_NodeE ditor\WorkSpace

or

\Program Files\NewTek\"YourLWversion"\support\presets\Image FilterHandler\ImageFilter_NodeEditor\WorkSpace

...or any folder name you set for this type of node setups. Here use 3 main groups: Multipass, Compositing_FX and Color Grading.


Gerardo
 

Attachments

  • DP-Denoiser.zip
    1.8 KB · Views: 174
Last edited:

just very happy you shared this trick!  :) :)

oh, by the way, is there any easy way to "mask out" objects from the Denoiser node ?

note, for the curious, i realized later on that i missed 1-2 things about the Denoiser setup, so made some additional notes >
https://www.youtube.com/watch?v=yZyu7DS2Q9U
 
Last edited:
Maybe you could try with DP Mask Surfaces/Objects by multiplying the output mask by the Blur coefficient.

Using the ReflectionColor driven by a BoxStep node in the RefAlpha input of the Reflection Denoiser may help sometimes as well.


Gerardo
 
That is some superb content. I was reviewing the article that Erikals added as a thread from Gerardo Estrada but I feel it was containing only the first part, the one referring to how to get the different render buffers ready to comp.
Apparently there was a second part on how to compound them and FX, and a third one referring to color.... Any ideas?
 
Back
Top