Knowledge Base Contributor
Moderator
IVGA Pro for Windows®
20120914.GST
Product(s)
iVGA, TriCaster 455, TriCaster 855
PROBLEM DESCRIPTION
For an iVGA source to be recognized by TriCaster, you must first install a small iVGA client program on the desired computer. The machine must also be actively connected to your network.
NewTek provides iVGA client programs for:
Microsoft Windows® (2000, XP and Vista, and Windows 7)
Apple OS X®.
You will find the iVGA installation files inside the:
C:\TriCaster\Extras folder,
or on the supplied iVGA disk.
This document follows the installation and layout of iVGA PRO for Microsoft Windows® systems. 228
The iVGA PRO™ installation for Microsoft Windows® systems is supplied as an executable (program) file. To install it:
Copy this file to the client system from its location in the iVGA folder (found inside on C:\TriCaster\Extras).
Run iVGA on the client computer by double-clicking its icon (iVGA PRO will run from anywhere you put it on the client system hard drive).
The First time you launch iVGA PRO you will be asked to accept an End User License Agreement.
Afterward several things will occur:
A small icon is added to the Windows® taskbar notification area.
The iVGA PRO control panel is opened on your desktop.
The Control Panel
View attachment 131985
Let’s begin our review of the tools provided by looking more closely at the control panel.
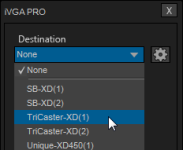
Destination
The default Destination setting is None, indicating that iVGA PRO’s audio and video output is connected to a TriCaster on your local network.
When one or more TriCaster systems are detected, the drop-down menu will display their machine names.
A given TriCaster may display more than one possible entry in the list depending on how many are currently free for iVGA selection.
View attachment 131986
Alternatively, TriCaster operators on the same network can directly select your iVGA client as a network source for their Net 1 or Net 2 inputs.
In the event a TriCaster you have NOT previously connected to selects your iVGA output, iVGA will display a “connection request” dialog. You can then authorize or decline the connection request.
Recording
View attachment 131987
The last entry in the Destination menu is always Record. Selecting Record redirects iVGA PRO output into a movie file instead of transmitting it across the network.
If you select Record a file window opens to let you see the path and file name for the clip that will be captured.
Also if you chose Record, the Send button at the bottom of the control panel is re-labeled Record.
Clicking this button initiates recording of the current iVGA source. Press it again to end capture.
Quality
Click the Configure (gear) button beside Destination to reveal a menu providing quality options.
These settings affect iVGA’s video compression parameters. You can use these options to improve performance when your local network connection lacks the bandwidth required to deliver the highest quality iVGA output to TriCaster.
NOTE: Gigabit network connection provides the best transfer rates and the best quality video output. Slower connections may cause dropped frames and should be considered unsuitable, especially for HD sessions. In extreme cases, where network capability is low or unreliable because of other traffic, iVGA may still be useful for static displays.
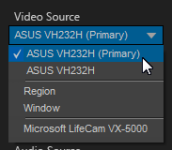
Video Source
The video source menu governs the imagery iVGA transmits or captures. The menu lists a number of important options:
View attachment 131988
At the top, you will see all monitors connected to the system iVGA PRO is running on by name. Selecting a monitor by name assigns its entire display as the current iVGA source.
Just beneath the list of monitors is the Region option. This refers to the portion of the screen that is inside a rectangular marquee (shown when Region is selected).
When selected you can:
Drag the cross-hair icon in the center of the marquee to relocate it on the screen or to a different monitor.
Drag the mouse on any border of the marquee to scale it up or down. By default, scaling is constrained to retain a 16:9 marquee aspect. Hold down Ctrl when dragging to release the aspect lock. To restore the marquee’s standard widescreen aspect, simply drag the border again without the Ctrl key depressed.
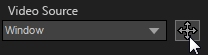
The next “Video Source” option shown in the menu is “Window”. This is a particularly useful option, as it allows you to ‘snap’ iVGA to a specific application window (or child window).
For example, you might designate just the video player pane on a web browser page or in Skype™ as the source; or perhaps you might want to snap to the video display pane to an application window.
When you select the Window option in the Video Source menu, a new icon is shown at right (see below). Click the mouse on this icon, and then drag it to the application window you want to assign as the source. (The marquee updates as you drag the mouse around the screen from one application window to another.)
View attachment 131989
Finally, if you have any webcams or similar video input devices connected to the system, you’ll see these listed below the Window option in the Video Source menu.
AUDIO SOURCE
This menu allows you to directly select sound from available audio inputs and system audio devices (the latter may provide useful level and mixing options). iVGA PRO transmits the selected sound to the Network inputs of TriCaster’s that support this feature. A nearby mute icon allows you to toggle sound output on/off.
OPTIONS
Hide Mouse Cursor –the mouse pointer will not appear on iVGA’s video output when this option is enabled.
Follow Mouse – the marquee tracks mouse movement when this option is enabled.
Show Marquee – turns the marquee display (and screen dimming) off in Region mode.
SEND/RECORD/STOP
A multi-function button at the bottom of the iVGA PRO control panel toggles output (or recording) on and off. The button label updates to display the action that will occur if you click it according to the current operation and state of the application. It may variously show Send, Record or Stop, as appropriate.
TASKBAR ICON MENU
A ‘radio beacon’ icon (shown at left in Figure 229) is shown in the system taskbar when iVGA PRO is running. The icon shows a ‘radiating’ animation when connected to a TriCaster.
View attachment 131990
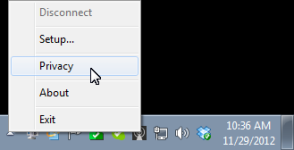
Click the icon to show the iVGA PRO Control Panel (and marquee, when enabled). Right-click the icon to display its context menu (Figure 230) listing the following items:
View attachment 131991
Disconnect – releases the currently selected TriCaster
connection (equivalent to selecting
None in the control panel Destination
menu).
Setup – shows the iVGA PRO control panel.
Privacy – while engaged, iVGA PRO’s video output is replaced by a static privacy image (see hint below) and audio output is muted. Privacy mode allows the user to check e-mail, or perhaps view or arrange something, without risk of the audience observing. The taskbar icon shows a red indicator when Privacy mode is engaged.
About – displays information about the application.
Exit (exits the iVGA application)
HOTKEYS
In Region mode, it’s possible to zoom the marquee to several preset sizes (150%, 200%, 400%) using the hotkeys Right Ctrl + number pad 1, 2 or 3 (these hotkeys enable Region mode).
Right Ctrl + (number pad) 0 selects the full screen for output.
Pressing Right Ctrl + (number pad) 5 toggles the Show Marquee setting
Right Ctrl + (number pad) 9 enables or disables the Follow Mouse option.
20120914.GST
Product(s)
iVGA, TriCaster 455, TriCaster 855
PROBLEM DESCRIPTION
For an iVGA source to be recognized by TriCaster, you must first install a small iVGA client program on the desired computer. The machine must also be actively connected to your network.
NewTek provides iVGA client programs for:
Microsoft Windows® (2000, XP and Vista, and Windows 7)
Apple OS X®.
You will find the iVGA installation files inside the:
C:\TriCaster\Extras folder,
or on the supplied iVGA disk.
This document follows the installation and layout of iVGA PRO for Microsoft Windows® systems. 228
The iVGA PRO™ installation for Microsoft Windows® systems is supplied as an executable (program) file. To install it:
Copy this file to the client system from its location in the iVGA folder (found inside on C:\TriCaster\Extras).
Run iVGA on the client computer by double-clicking its icon (iVGA PRO will run from anywhere you put it on the client system hard drive).
The First time you launch iVGA PRO you will be asked to accept an End User License Agreement.
Afterward several things will occur:
A small icon is added to the Windows® taskbar notification area.
The iVGA PRO control panel is opened on your desktop.
The Control Panel
View attachment 131985
Let’s begin our review of the tools provided by looking more closely at the control panel.
Destination
The default Destination setting is None, indicating that iVGA PRO’s audio and video output is connected to a TriCaster on your local network.
When one or more TriCaster systems are detected, the drop-down menu will display their machine names.
A given TriCaster may display more than one possible entry in the list depending on how many are currently free for iVGA selection.
View attachment 131986
Alternatively, TriCaster operators on the same network can directly select your iVGA client as a network source for their Net 1 or Net 2 inputs.
In the event a TriCaster you have NOT previously connected to selects your iVGA output, iVGA will display a “connection request” dialog. You can then authorize or decline the connection request.
Recording
View attachment 131987
The last entry in the Destination menu is always Record. Selecting Record redirects iVGA PRO output into a movie file instead of transmitting it across the network.
If you select Record a file window opens to let you see the path and file name for the clip that will be captured.
Also if you chose Record, the Send button at the bottom of the control panel is re-labeled Record.
Clicking this button initiates recording of the current iVGA source. Press it again to end capture.
Quality
Click the Configure (gear) button beside Destination to reveal a menu providing quality options.
These settings affect iVGA’s video compression parameters. You can use these options to improve performance when your local network connection lacks the bandwidth required to deliver the highest quality iVGA output to TriCaster.
NOTE: Gigabit network connection provides the best transfer rates and the best quality video output. Slower connections may cause dropped frames and should be considered unsuitable, especially for HD sessions. In extreme cases, where network capability is low or unreliable because of other traffic, iVGA may still be useful for static displays.
Video Source
The video source menu governs the imagery iVGA transmits or captures. The menu lists a number of important options:
View attachment 131988
At the top, you will see all monitors connected to the system iVGA PRO is running on by name. Selecting a monitor by name assigns its entire display as the current iVGA source.
Just beneath the list of monitors is the Region option. This refers to the portion of the screen that is inside a rectangular marquee (shown when Region is selected).
When selected you can:
Drag the cross-hair icon in the center of the marquee to relocate it on the screen or to a different monitor.
Drag the mouse on any border of the marquee to scale it up or down. By default, scaling is constrained to retain a 16:9 marquee aspect. Hold down Ctrl when dragging to release the aspect lock. To restore the marquee’s standard widescreen aspect, simply drag the border again without the Ctrl key depressed.
The next “Video Source” option shown in the menu is “Window”. This is a particularly useful option, as it allows you to ‘snap’ iVGA to a specific application window (or child window).
For example, you might designate just the video player pane on a web browser page or in Skype™ as the source; or perhaps you might want to snap to the video display pane to an application window.
When you select the Window option in the Video Source menu, a new icon is shown at right (see below). Click the mouse on this icon, and then drag it to the application window you want to assign as the source. (The marquee updates as you drag the mouse around the screen from one application window to another.)
View attachment 131989
Finally, if you have any webcams or similar video input devices connected to the system, you’ll see these listed below the Window option in the Video Source menu.
AUDIO SOURCE
This menu allows you to directly select sound from available audio inputs and system audio devices (the latter may provide useful level and mixing options). iVGA PRO transmits the selected sound to the Network inputs of TriCaster’s that support this feature. A nearby mute icon allows you to toggle sound output on/off.
OPTIONS
Hide Mouse Cursor –the mouse pointer will not appear on iVGA’s video output when this option is enabled.
Follow Mouse – the marquee tracks mouse movement when this option is enabled.
Show Marquee – turns the marquee display (and screen dimming) off in Region mode.
SEND/RECORD/STOP
A multi-function button at the bottom of the iVGA PRO control panel toggles output (or recording) on and off. The button label updates to display the action that will occur if you click it according to the current operation and state of the application. It may variously show Send, Record or Stop, as appropriate.
TASKBAR ICON MENU
A ‘radio beacon’ icon (shown at left in Figure 229) is shown in the system taskbar when iVGA PRO is running. The icon shows a ‘radiating’ animation when connected to a TriCaster.
View attachment 131990
Click the icon to show the iVGA PRO Control Panel (and marquee, when enabled). Right-click the icon to display its context menu (Figure 230) listing the following items:
View attachment 131991
Disconnect – releases the currently selected TriCaster
connection (equivalent to selecting
None in the control panel Destination
menu).
Setup – shows the iVGA PRO control panel.
Privacy – while engaged, iVGA PRO’s video output is replaced by a static privacy image (see hint below) and audio output is muted. Privacy mode allows the user to check e-mail, or perhaps view or arrange something, without risk of the audience observing. The taskbar icon shows a red indicator when Privacy mode is engaged.
About – displays information about the application.
Exit (exits the iVGA application)
HOTKEYS
In Region mode, it’s possible to zoom the marquee to several preset sizes (150%, 200%, 400%) using the hotkeys Right Ctrl + number pad 1, 2 or 3 (these hotkeys enable Region mode).
Right Ctrl + (number pad) 0 selects the full screen for output.
Pressing Right Ctrl + (number pad) 5 toggles the Show Marquee setting
Right Ctrl + (number pad) 9 enables or disables the Follow Mouse option.