Knowledge Base Contributor
Moderator
PROBLEM DESCRIPTION
One of iVGA Pro’s new features is the ability to capture audio from a recording device on your computer and send it over Ethernet along with the video. This can allow you to use the webcam and microphone on your laptop as another input into a TriCaster system.
What can be even more useful is the ability to play a clip on your computer along with the audio effectively turning your computer into another DDR.
However, for this ability to work, the audio card on your system needs to support a feature called ‘audio loopback’. This is where the sound from your computer is send back into itself as a recording device.
Some audio cards have this feature, it is usually called ‘Stereo Mix’ or ‘What U Hear’, which shows up in your recording devices. If your computer has this device then you might not need anything else. Just tell iVGA Pro to use it. However, many audio cards are not offering this feature therefore limiting this useful function of iVGA Pro.
SOLUTION AND WORKAROUND
Not to worry, there are solutions. Here are a few:
Lets take a closer look at these options:
There are a few things you that should know before proceeding further. First, Virtual Audio Cable (VAC for short) isn’t free. There is a trial version so you can experiment with it first, which you should do to make sure it will perform as you expect for your needs. In the trial mode, you will hear the word ‘trial’ spoken on the VAC microphone about every 3 seconds.
1. First, let’s get the tools that make everything work. The first link is to the VAC website.
http://software.muzychenko.net/eng/vac.htm
The download from the page contains both 32-bit and 64-bit versions, make sure you install the correct version for your Windows system. The default settings will be fine for what we need.
2. The next tool you want to download is called ‘nircmd’. We can use this tool to change the default audio playback device in a script to make it easy to switch between to your computer hardware sound card and the VAC playback device when you need to. You can download ‘nircmd’ from here.
http://www.nirsoft.net/utils/nircmd.html
The bottom of the page has versions for both 32-bit and 64-bit Windows. Download the correct type for the Windows system you are using. Copy the files that you extract into your “C:\Windows” folder so you can use this command from scripts.
3. You should now have VAC installed and the ‘nircmd’ in your C:\Windows folder and are now ready to proceed. There is also one more thing that you need, the script file that came with this document called ‘Audio Loopback’, make sure this is sitting on the desktop of your computer.
Okay, let’s explain how this is going to work. You are going to set your computer’s default playback device to VAC. This will route all default audio to this sound card. When the computer it set to use VAC as its sound card, you will not hear audio come out of the computer speakers. This is normal.
There is a tool that comes with VAC called ‘Audio Repeater (MME)’
that we can use to duplicate the audio in VAC to another playback device (in this case your Speakers) if you want to hear audio while VAC is active.
When VAC is receiving audio, it is automatically going into the VAC microphone and that is what we set iVGA Pro to use for its audio input.
When we are done, we will set the computer back to your real sound card so it operates like it normally would.
Don’t worry if this sounds difficult, because we have a clickable script to make this all easy for you. Here is how you use it!
Double click on the ‘Audio Loopback’ icon that you have placed on your desktop.
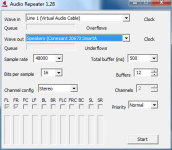
You should see the Audio Repeater window open. We need to make sure that the ‘Wave Out’ is on the correct setting for you to hear audio. Usually this is the one selection starting with ‘Speakers’ in the name. Select it and press the ‘Start’ button in the bottom right corner.
View attachment 132089
Now play something with audio and if you hear it, everything is working.
If you don’t hear anything, press ‘Stop’ select another ‘Wave Out’ device and press Start again. Once you hear audio, you are ready to start iVGA Pro.
Once special note, DO NOT close the Audio Repeater application until you are done using VAC with iVGA Pro. Once you close Audio Repeater, the script will configure your computer to use its standard sound card (not VAC), and then iVGA Pro will not be able to get the audio anymore. If you don’t need to hear audio on the local computer while using iVGA Pro, just press the ‘Stop’ button in the bottom right corner of the window. Even if Audio Repeater is stopped, VAC will still continue to function.
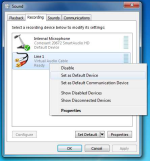
Next we need to set our default recording device to VAC. At this point, the command that allows us to control the default playback device in our script doesn’t have support to control the default recording device, so we need to do this manually.
View attachment 132090
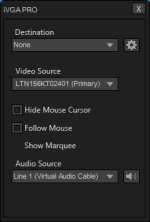
Now run iVGA Pro. In the Window that opens, choose ‘Line 1 (Virtual Audio Cable)’ as the Audio Source input. Once that is selected, iVGA Pro will get its audio from VAC.
Now play something with audio on your system, make sure that TriCaster is receiving the signal from this iVGA Pro system. You will see the video and hear the audio from your computer in TriCaster. You are ready to use iVGA Pro with your computer audio.
View attachment 132091
Here are few other iVGA Pro tips:
Find an application that doesn’t work with our Audio Loopback script?
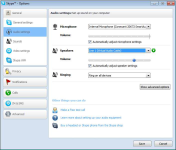
It can happen. Some applications will select the audio device they are going to work with, and even with our script running, they will continue to use the audio device they are set to. Skype is a prime example of such an application. In these cases, you are going to have to tell the application to use the VAC audio device. In the case of Skype, here is what you need to do.
View attachment 132092
One of iVGA Pro’s new features is the ability to capture audio from a recording device on your computer and send it over Ethernet along with the video. This can allow you to use the webcam and microphone on your laptop as another input into a TriCaster system.
What can be even more useful is the ability to play a clip on your computer along with the audio effectively turning your computer into another DDR.
However, for this ability to work, the audio card on your system needs to support a feature called ‘audio loopback’. This is where the sound from your computer is send back into itself as a recording device.
Some audio cards have this feature, it is usually called ‘Stereo Mix’ or ‘What U Hear’, which shows up in your recording devices. If your computer has this device then you might not need anything else. Just tell iVGA Pro to use it. However, many audio cards are not offering this feature therefore limiting this useful function of iVGA Pro.
SOLUTION AND WORKAROUND
Not to worry, there are solutions. Here are a few:
- Purchase a new soundcard for your computer that features audio loopback capability.
- Use an audio patch cable to manually route the output of your computer back into its input.
- Virtual Audio Cable.
Lets take a closer look at these options:
- Option 1(the new soundcard) has some problems. First it is difficult to know what audio cards support audio loopback. This isn’t a typical feature listed on the side of the box. So unless you get a chance to try before you buy or find someone that can verify this feature for in you advance, you might be purchasing hardware that isn’t going to have this feature.
- Option 2 (the audio patch cable) is a cheap fix, but is not perfect either. Some audio inputs are only mono and would therefore ruin the stereo audio you might like to send to your TriCaster. Also some computers only have 1 audio input and if you are trying to send an audio feed back into your system (like for Skype) you need to keep your microphone input available for that use. Also some laptops, use the same port for audio output and microphone input (like you find on your smartphone) which make it very difficult to route audio into the same port that is coming out of. Lastly, even when you get it all hooked up, you are going from digital to analog and then back to digital audio, so additional noise or loss of audio quality can occur.
- This leaves us with option 3. What is Virtual Audio Cable? It’s a software tool you install on your computer and it installs an additional playback device (i.e. sound card) and recording device (i.e. microphone) that are ‘connected’ inside the computer. Anything that is sent to the output to the Virtual Audio Cable playback device will automatically be received in the input of the Virtual Audio Cable recording device. It is just like option 2, but with no cable that can be unplugged and it doesn’t use any of the physical ports on your computer which also means that you stay digital though the entire process.
There are a few things you that should know before proceeding further. First, Virtual Audio Cable (VAC for short) isn’t free. There is a trial version so you can experiment with it first, which you should do to make sure it will perform as you expect for your needs. In the trial mode, you will hear the word ‘trial’ spoken on the VAC microphone about every 3 seconds.
1. First, let’s get the tools that make everything work. The first link is to the VAC website.
http://software.muzychenko.net/eng/vac.htm
The download from the page contains both 32-bit and 64-bit versions, make sure you install the correct version for your Windows system. The default settings will be fine for what we need.
2. The next tool you want to download is called ‘nircmd’. We can use this tool to change the default audio playback device in a script to make it easy to switch between to your computer hardware sound card and the VAC playback device when you need to. You can download ‘nircmd’ from here.
http://www.nirsoft.net/utils/nircmd.html
The bottom of the page has versions for both 32-bit and 64-bit Windows. Download the correct type for the Windows system you are using. Copy the files that you extract into your “C:\Windows” folder so you can use this command from scripts.
3. You should now have VAC installed and the ‘nircmd’ in your C:\Windows folder and are now ready to proceed. There is also one more thing that you need, the script file that came with this document called ‘Audio Loopback’, make sure this is sitting on the desktop of your computer.
Okay, let’s explain how this is going to work. You are going to set your computer’s default playback device to VAC. This will route all default audio to this sound card. When the computer it set to use VAC as its sound card, you will not hear audio come out of the computer speakers. This is normal.
There is a tool that comes with VAC called ‘Audio Repeater (MME)’
that we can use to duplicate the audio in VAC to another playback device (in this case your Speakers) if you want to hear audio while VAC is active.
When VAC is receiving audio, it is automatically going into the VAC microphone and that is what we set iVGA Pro to use for its audio input.
When we are done, we will set the computer back to your real sound card so it operates like it normally would.
Don’t worry if this sounds difficult, because we have a clickable script to make this all easy for you. Here is how you use it!
Double click on the ‘Audio Loopback’ icon that you have placed on your desktop.
You should see the Audio Repeater window open. We need to make sure that the ‘Wave Out’ is on the correct setting for you to hear audio. Usually this is the one selection starting with ‘Speakers’ in the name. Select it and press the ‘Start’ button in the bottom right corner.
View attachment 132089
Now play something with audio and if you hear it, everything is working.
If you don’t hear anything, press ‘Stop’ select another ‘Wave Out’ device and press Start again. Once you hear audio, you are ready to start iVGA Pro.
Once special note, DO NOT close the Audio Repeater application until you are done using VAC with iVGA Pro. Once you close Audio Repeater, the script will configure your computer to use its standard sound card (not VAC), and then iVGA Pro will not be able to get the audio anymore. If you don’t need to hear audio on the local computer while using iVGA Pro, just press the ‘Stop’ button in the bottom right corner of the window. Even if Audio Repeater is stopped, VAC will still continue to function.
Next we need to set our default recording device to VAC. At this point, the command that allows us to control the default playback device in our script doesn’t have support to control the default recording device, so we need to do this manually.
- Right click on the speaker icon found in the Window’s tray in the bottom right corner of the screen.
- Choose ‘Recording devices’ from the menu that appears. You will see a window open that will show you all of the recording devices available on your system.
- Right click on the device called ‘Line 1, Virtual Audio Cable’ and choose the option called ‘Set as Default Device,’ right click again and choose ‘Set as Default Communication Device.’
- Once you have done this, there will only be a green checkmark on the Line 1 device. After you are done using iVGA Pro you will change this back to your normal microphone using the same process if you need to use the microphone outside of iVGA Pro.
View attachment 132090
Now run iVGA Pro. In the Window that opens, choose ‘Line 1 (Virtual Audio Cable)’ as the Audio Source input. Once that is selected, iVGA Pro will get its audio from VAC.
Now play something with audio on your system, make sure that TriCaster is receiving the signal from this iVGA Pro system. You will see the video and hear the audio from your computer in TriCaster. You are ready to use iVGA Pro with your computer audio.
View attachment 132091
Here are few other iVGA Pro tips:
- Use wired Gigabit Ethernet as your connection between the iVGA Pro client and the TriCaster when possible. While 802.11n WiFi is fast, it still isn’t as fast as Gigabit. You will always get best performance when working with Gigabit Ethernet.
- Internet Explorer 9 appears to play video/audio in sync better than some other browsers when using VAC. So if you are looking to play YouTube or other Flash clips though iVGA Pro and are running into sync issues, give IE9 a try.
- If you have NLE software (like SpeedEDIT) on your system, put the video in full screen mode and you basically have another DDR feeding into your TriCaster and it has the power of a full non-linear editing system behind it!
Find an application that doesn’t work with our Audio Loopback script?
It can happen. Some applications will select the audio device they are going to work with, and even with our script running, they will continue to use the audio device they are set to. Skype is a prime example of such an application. In these cases, you are going to have to tell the application to use the VAC audio device. In the case of Skype, here is what you need to do.
- In Skype’s ‘Tool’ menu, select ‘Options’. In the window that opens, select ‘Audio Settings’ on the left side.
- Under Speakers, choose ‘Line 1 (Virtual Audio Cable)’ from the options.
- This will tell Skype to use this device. If you will need to manually change it back if you want to use Skype without VAC.
View attachment 132092