Knowledge Base Contributor
Moderator
How to set up a Pull stream on a TriCaster 455 or 855
Problem Description and Steps to Verify/Reproduce
This Article addresses in-short how to setup a Pull stream.
NOTE: Pull streaming is referred to as “Simple” streaming on page 87 of the TriCaster User Manual. If you do not have a device handy capable of scanning and loading the manual you can manually navigate to them from the Windows Desktop. They are located along the following path:
C:\TriCaster\Documentation
Steps to Fix/Workaround
1. In the “Live Production” panel, click on the Gear icon next to the “Stream” button,
View attachment 131776
this will open the “Configure Stream Connection” panel.
View attachment 131777
2. Under “Connection” click on “New”
View attachment 131778
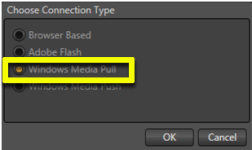
3. You will be presented with a box titled “Choose Connection Type”. From the list choose “Windows Media Pull” , then click OK.
View attachment 131779
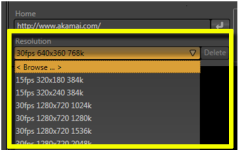
4. Now you need to choose a “Resolution” from the pull-down menu.
View attachment 131780
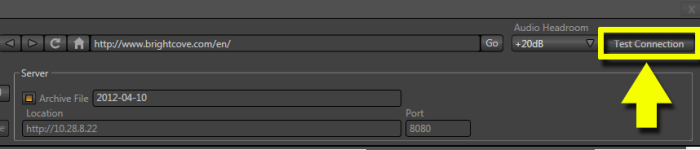
5. With a resolution selected, click the “Test” button. The IP address of your computer will show up in the “Location” field
View attachment 131781
You can now close the “Configure Stream Connection” panel, and click on the “Stream” button. Your system should now be performing a Pull stream. You can provide the IP that showed up in the Location field to those on your network that you want to view the stream.
NOTE: The IP address much contain a colon at the end followed by a port number inorder for it to work.
NOTE2:If your machine is behind a firewall or router you may need to refer to Chapter 15 of the manual for more elaborate details on setting up a stream under these conditions.
Problem Description and Steps to Verify/Reproduce
This Article addresses in-short how to setup a Pull stream.
NOTE: Pull streaming is referred to as “Simple” streaming on page 87 of the TriCaster User Manual. If you do not have a device handy capable of scanning and loading the manual you can manually navigate to them from the Windows Desktop. They are located along the following path:
C:\TriCaster\Documentation
Steps to Fix/Workaround
1. In the “Live Production” panel, click on the Gear icon next to the “Stream” button,
View attachment 131776
this will open the “Configure Stream Connection” panel.
View attachment 131777
2. Under “Connection” click on “New”
View attachment 131778
3. You will be presented with a box titled “Choose Connection Type”. From the list choose “Windows Media Pull” , then click OK.
View attachment 131779
4. Now you need to choose a “Resolution” from the pull-down menu.
View attachment 131780
5. With a resolution selected, click the “Test” button. The IP address of your computer will show up in the “Location” field
View attachment 131781
You can now close the “Configure Stream Connection” panel, and click on the “Stream” button. Your system should now be performing a Pull stream. You can provide the IP that showed up in the Location field to those on your network that you want to view the stream.
NOTE: The IP address much contain a colon at the end followed by a port number inorder for it to work.
NOTE2:If your machine is behind a firewall or router you may need to refer to Chapter 15 of the manual for more elaborate details on setting up a stream under these conditions.
Attachments
-
 44d0cf77-db1a-c288-0a80-4fd613218d13clickongear.png124.8 KB · Views: 373
 -
 6720ae36-4fb8-9b1f-b189-4fd614c1d6f9configurestrmpanel.png322.7 KB · Views: 388
 -
 e972898d-3b08-d79f-0ab9-4fd614301f45configurestreamNEW.png11 KB · Views: 351
 -
 a962c0bf-8ee1-b5fa-7d00-4fd6149fd092windowmedpull.png19.9 KB · Views: 380
 -
 b47608d8-0dad-d5b1-01e1-4fd6147b790fchooseresolution.png38.2 KB · Views: 367
 -
 d0cc874e-ac01-f05f-9ec6-4fd614ccf019testbutton.png18.3 KB · Views: 390